Things You'll Need
Fabric
Sewing machine
Thread
Measuring tape
Ribbon or other decorations (optional)

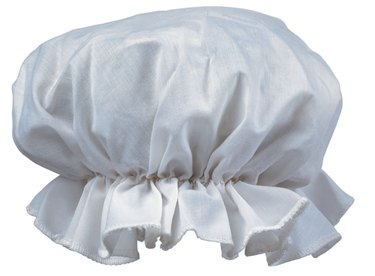
Making your own doll bonnet is a fun and easy sewing project perfect for beginners. If you are learning to sew or teaching someone to sew, this is a great project to start with. It is also suitable for young children learning to sew. This fast and simple project produces a great finished look, which will add to your child's sense of accomplishment. As an advantage to sewing your own bonnet, you can add colors and decorations to personalize the look. Children will love giving their dolls a style that suits their own personal tastes.
Step 1
Measure the distance from the middle of the doll's forehead, over the top of the head and back to the nape of the neck.
Video of the Day
Step 2
Add 3 inches to the measurement for a 1-inch ruffle on your bonnet. Add 5 inches to the measurement to make a bonnet with a 2-inch ruffle.
Step 3
Cut out a circle of fabric with the diameter calculated in Step 2.
Step 4
Fold up a ½ inch hem around the entire circle, and pin it.
Step 5
Turn the raw edge under ¼ inch, and sew the hem.
Step 6
Draw a circle on the inside of the hat. For a 1-inch ruffle, the circle should be 1 inch from the edge of the fabric. For a 2-inch ruffle, draw the circle 2 inches from the edge.
Step 7
Baste stitch around the circle, making sure not to overlap your threads when you reach the end of the circle.
Step 8
Pull the basting threads to gather the hat to the size of the doll's head.
Step 9
Knot the thread ends together, and adjust the fabric to even out the ruffle.
Tip
Embellish your bonnet by sewing a ribbon around the gather line on the outside of the hat. Add flowers or any other decorative items by sewing or gluing them on.
Add a tie under the chin by sewing two equal lengths of ribbon, one on each side of the bonnet at about the ear. Sew the ribbon ends to the bonnet at the inside gather line.
Video of the Day