Things You'll Need
Closed-cell foam wreath form
4-inch closed-cell foam circle
Phillips screwdriver
1 can of expanding cell foam insulation
8 dowels
8 wooden pegs
Plastic bushing
Utility knife
4 large pieces of cardboard, at least 36 by 96 inches
Tall cardboard box, at least 20 by 36 inches
Sheetrock or packing tape (optional)
Screen roller
Straightedge
Contact cement
Construction adhesive
8-inch cardboard tube concrete form
High-temperature hot-melt glue and glue gun
1-inch PVC electrical bushing
1 piece of 3/4-inch PVC, 18 inches long
3/4-inch PVC end cap
3/4-inch PVC coupler
3/4-inch PVC elbow
3 pipe brackets, 1-inch
Paintable caulk
Water-based primer
Latex paint (various colors)
Colored duct tape
2 closed-cell wreath forms (optional, for lifesavers)
Blue sheet (optional)
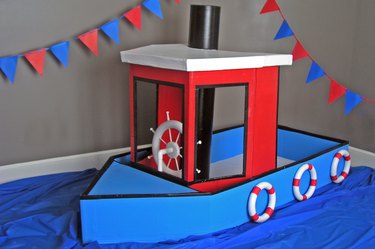
Playhouses offer children a wonderful outlet for creativity and imagination. This cardboard tugboat welcomes kids aboard on an adventure to explore the seas and sail to faraway lands. Built with salvaged cardboard, it is a relatively inexpensive project and quick to put together but can be made durable as well.
Step 1
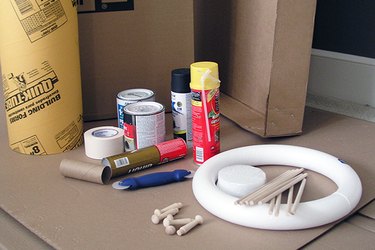
Collect the supplies. Visit a local home improvement store early in the morning, and you will find employees unpacking and setting up displays. They are usually happy to help you find the cardboard you need. Always ask -- do not assume that anything will be discarded.
Video of the Day
Step 2
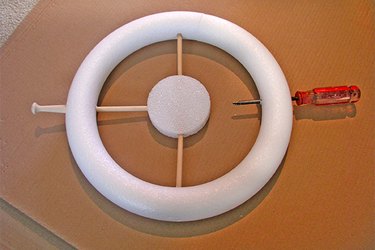
Make the steering wheel. Set the foam circle in the center of the foam wreath form. Measure the distance between the foam wreath and the foam circle, and then add 1 inch. Cut 8 dowels to this measurement. Punch through the side of the foam wreath with a screwdriver. Fill the inside hole with a small amount of spray foam insulation. Push a dowel through the hole, and push the other end of the dowel into the center foam circle. Repeat with the other dowels, making sure to space them evenly around the ring.
Note: Spray foam cures in about 10 seconds, so you'll need to work quickly when using it.
Step 3
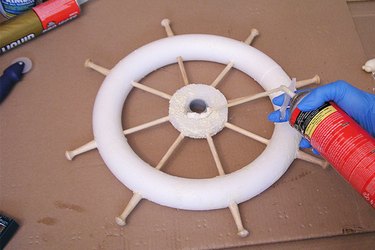
Finish the steering wheel. Set the wooden pegs into the foam wreath at the end of the dowels using a very small amount of the spray foam insulation as glue. Punch the plastic bushing through the center of the foam circle and secure it in place with the spray foam insulation. Set aside to dry. You will need to cut away excess expanded foam with a utility knife when completely dry. Sand if necessary. Prime and paint the wheel.
Step 4
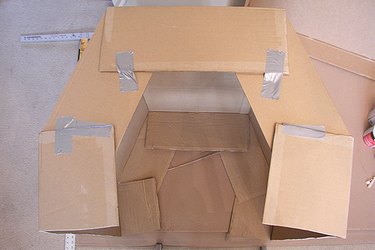
Make the wheelhouse. Split the tall cardboard box down the center of the widest side. Open the box into a semi-octagon shape. Arrange the box so that the widest point is about 32 inches long, and tape in place. Trace lines at the connection points where the five flaps will join together. Paint these overlapping areas with contact cement and allow to dry. Join the five flaps together. Repeat this procedure with the opposite end of the box.
Step 5
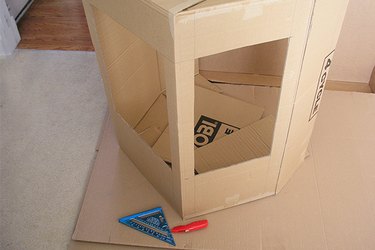
Cut the wheelhouse windows. Cut large windows in the front and side sections of the wheelhouse, starting 12 inches from the bottom and leaving at least 2 inches on each side. Cut reinforcing strips from scrap cardboard, and glue them on the inside of the window corners.
Step 6
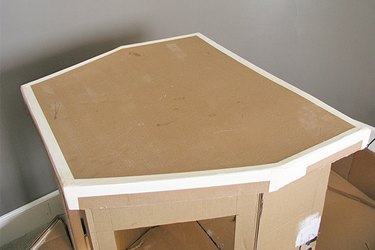
Make the roof and base for the wheelhouse. Set the wheelhouse section on a sheet of cardboard and trace the outline. Cut out the traced shape to use as the inside base. Use this as a template to draw another piece and add 3 inches to the perimeter. Cut out these lines and score 2 inches inside the cut edge. Fold along the score lines, cutting through the cardboard at the corners and folding to form an edge. Glue the roof and base in place on the wheelhouse with contact cement.
Note: Sometimes heavy cardboard splits and does not fold cleanly. You can cover these areas with paper drywall tape or packing tape.
Step 7
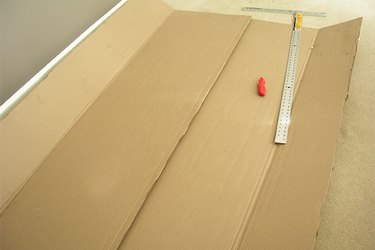
Create the boat floor. On two 96-inch pieces of cardboard, mark the long side 12 inches from the edge, score and fold in. Overlap the two cardboard pieces in the middle so that you have a width of 35 inches. Glue in place with contact cement or construction adhesive. Cut a filler cardboard piece to a width of 35 inches and place it over the overlapped pieces to even out the floor of the boat. Glue it in place.
Step 8
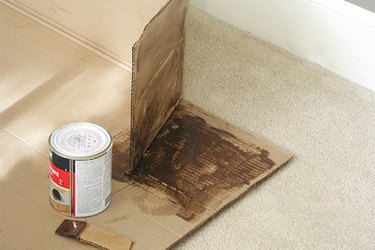
Form the boat end. Score a vertical line down each side fold of the boat that is 12 inches from the bottom. Cut through the cardboard at the 12-inch vertical score marks on each side. Fold the sides in and the bottom up to form the boat end. Glue in place with contact cement.
Step 9
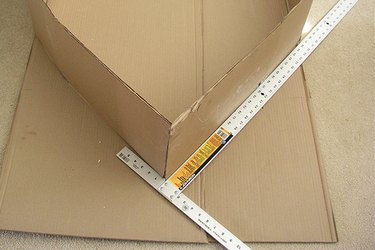
Form the bow. At the front of the boat, score a vertical line down each side fold of the boat that is 26 inches from the top. Cut through the side fold up to this score line. Fold these side flaps together to form a point in the center. Using a straightedge, draw lines along both sides of the pointed bow to trace the silhouette on the bottom floor of the boat.
Step 10
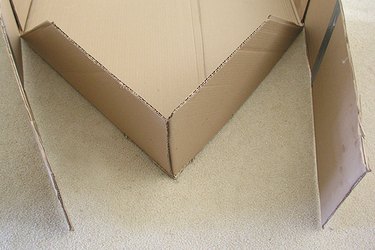
Fold and tape the bow. Pull the side flaps out of the way and score along the traced lines on the bottom floor of the boat. Measure 12 inches over, and cut through the cardboard. Fold these bottom sections up and tape together.
Step 11
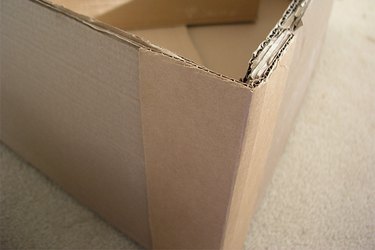
Reinforce the bow and boat end. Glue the side flaps to the pointed bow base with contact cement. Cut a small piece of cardboard to 12 inches by 4 inches. Score vertically in the center and glue around the bow point for reinforcement. Reinforce the rear corners in the same manner.
Step 12
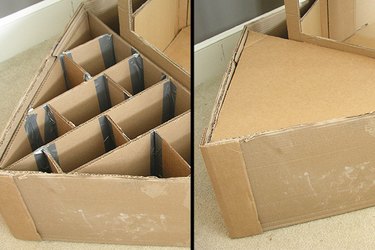
Make a brace for the bow. Cut two cardboard pieces to 12 inches by 35 inches. Glue together and set inside the bow of the boat to form a triangular-shaped brace. Cut strips of cardboard 11 inches wide and lengths necessary to form vertical and horizontal braces. Space the braces 3 to 4 inches apart in both directions. Tape in place. Cut a triangle-shaped piece of cardboard to fit on top of the brace (make sure it can fit inside the vertical edges of the bow). Using construction adhesive, set in place on top of the brace and glue.
Step 13
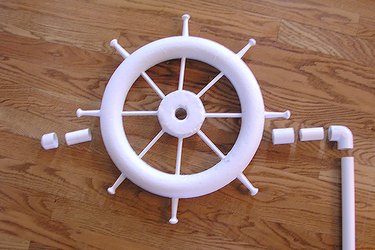
Assemble the wheel. Cut the 3/4-inch PVC pipe into one 14-inch piece and two 2-inch pieces. Set the 90-degree PVC elbow at the top of the 14-inch section. Insert a 2-inch piece of pipe into the side of the elbow, followed by the coupler, the second 2-inch piece of pipe, the wheel and finally the end cap.
Step 14
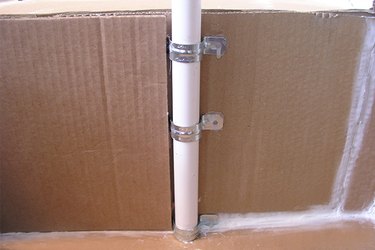
Install the wheelhouse. Set the wheelhouse assembly inside the boat and glue it against the bow brace and boat sides. Use filler cardboard pieces if necessary. Hot glue pipe brackets to the face inside the wheelhouse. Cut additional cardboard pieces to fit on each side of the pipe brackets, and glue them over the brackets to add support. Once glue is dry, slide the wheel into place inside the brackets.
Step 15
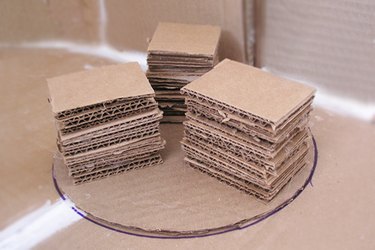
Create a mounting base for the smokestack. Using the cardboard tube as a template, draw and cut a circle from a scrap of cardboard. Cut scraps of cardboard into 2-by-3-inch squares. Glue these into three stacks of about 10 pieces each, and then glue them 1/4 inch from the circle edges. Locate the desired position of the smokestack, notching out the roof if necessary, and glue the mounting base to the floor of the boat in this position. Set the cardboard tube in place over the mounting base to check alignment, then remove.
Step 16
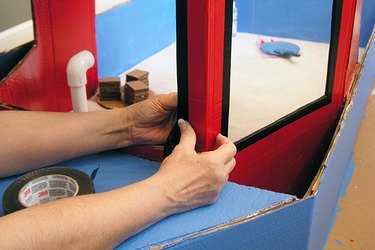
Paint the boat. Level out any areas necessary by adding filler pieces of cardboard. Use painters' caulk to seal the seams if desired, and paint the boat. Cardboard paints best with a water-based primer followed by latex paint. Cover all the raw cardboard edges with duct tape in any color you like.
Step 17
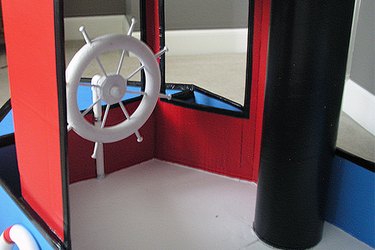
Install the smokestack. Paint the smokestack and allow it to dry before installing it on the mounting base.
Step 18
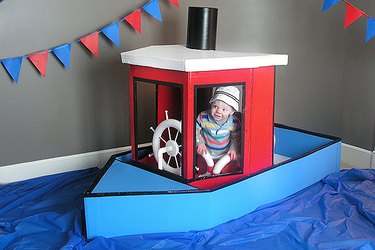
Finished boat. Add any finishing touches, such as lifesavers, to the side of the boat and a blue sheet underneath it to simulate water.
Tip
A cardboard wardrobe box works well for the wheelhouse. Always wear gloves when working with spray foam.
Warning
Use contact cement only in well-ventilated areas. Don't use regular spray paint or oil-based paint on foam, as it will dissolve it.
Video of the Day