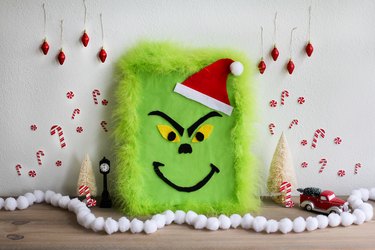
Dr. Seuss gave the world a most wonderful holiday gift in 1957 when he published "How the Grinch Stole Christmas!" Numerous television and movie adaptations have made the grumpy green villain an enduring Christmas character we all love to hate. You can see his grimace on Grinch Christmas wrapping paper sold in stores, but it's easy and fun to create your own Grinch gift wrap as a DIY project. With a few inexpensive supplies and a free printable template, transform a regular gift box of any size into a custom Grinch gift box that looks amazing under the tree. The Grinch wouldn't approve of such generosity – that is, until his heart grows full with the spirit of the season.
Video of the Day
Things You'll Need
Gift box
Tape
Green tissue paper
Printer paper
Scissors
Chalk
Felt (black and yellow)
Hot glue gun
Green feather boa
Mini Santa hat (or red and white felt and white pompom)
Step 1
Place the gift inside an appropriately sized gift box. Use a few pieces of tape around the edges to hold the lid securely on the box.
Step 2
Smooth out two or three layers of lime green (or Grinch green) tissue paper on a flat surface. Use enough layers of paper to be opaque and take care not to crinkle or tear the delicate paper.
Step 3
Wrap the gift box with the tissue paper and tape it in the same way that you would with regular wrapping paper. Work carefully to keep the folds neat and the paper smooth.
Step 4
Download the free template for the Grinch's face and print two copies on regular white printer paper. With scissors, cut out two paper shapes for the eyes, two for the eyebrows, two for the pupils and one each for the nose and mouth. Discard the excess paper.
Step 5
If you are cutting out a Santa hat instead of using a store-bought mini Santa hat, also cut out the hat and trim shapes from the paper.
Step 6
Place the two eyebrow and pupil paper templates plus the mouth and nose on the black felt. Trace around them with chalk and then cut out the felt shapes. Place the two paper eye templates on the yellow felt. Trace them and cut them out.
Step 7
If you're making a felt Santa hat, trace and cut the hat shape from red felt and the trim shape from white felt.
Step 8
Arrange the felt shapes to make the Grinch's face on top of the tissue-paper-covered gift box. Without gluing them down yet, position the shapes until you're happy with the appearance of the face.
Step 9
With a hot glue gun, lift up one shape at a time, apply glue to the back of the felt and press it back in the same place. Continue until the eyes, pupils, eyebrows, nose and mouth are securely glued to the gift box.
Step 10
Arrange the green feather boa around the outer perimeter of the box and trim the ends at the point where they meet.
Step 11
Apply hot glue around the perimeter of the Grinch gift box close to the top edge. Press the boa into the glue. Work a few inches at a time to give the Grinch gift box its fun, fuzzy trim.
Step 12
If you're using a store-bought mini Santa hat, glue it in place in the top corner of the box just above the Grinch's face. If you're making your own from felt, glue the red felt hat shape in place and then glue the trim along the bottom edge and the white pompom to the pointy top.
Step 13
Make sure all the glue is dry and the features are securely in place before moving the Grinch gift box. Be careful with the Grinch gift, as the tissue paper can easily rip.
Tip
It's possible to make a reusable version of the Grinch gift box. Instead of putting the gift inside the box and then wrapping it, wrap the lid and base of the gift box separately with green tissue paper. Add the Grinch's face, Santa hat and boa to the lid only. If the gift recipient takes care when removing and replacing the lid, it can be used again in the future.
Warning
Be careful and always supervise children when working with a hot glue gun.