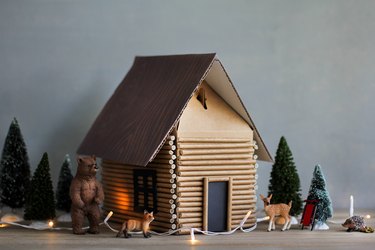
Got a mountain lover among you? Help them channel their inner lumberjack with a DIY gift box made to look like a charmingly rustic log cabin. Using paper straws as miniature "logs," this cozy little cabin looks surprisingly lifelike and gives off some serious cocoa-in-front-of-the-fire vibes. Chop down your holiday gift-wrapping list in one fell swoop because this one's guaranteed to be an over the hills and through the woods hit.
Video of the Day
Things You'll Need
Kraft paper gable box (4 3/4" x 8" x 8")
Wood grain paper straws, 3 packs of 25
Hot glue gun
Scissors
Cake boards (or scrap cardboard)
Masking or painter's tape
Wood grain pattern or brown paper
Black cardstock or paper
Step 1: Don't Forget the Present You Need to Wrap
Before getting started, be sure to place your present inside the Kraft paper gable gift box, and then close the box by securing the flaps at the top.
Step 2: Glue On the Paper Straws
Using a hot glue gun, glue paper straws to the sides of the box. To get the more rustic stacked log look, we slightly staggered the placement of the straws versus gluing all of them uniformly on top of each other.
Tip
We used straws that had a wood grain pattern (found in the party section at our local craft store), but you could use plain brown Kraft paper straws, or you could even spray paint paper straws a brown color.
Step 3: Trim the Straws for the Short Sides
Trim the straws as needed to fit the shorter sides of the box.
Step 4: Cut Cake Boards to Make the Roof
To make the roof, cut two cake boards or scrap cardboard pieces to the same width as the long sides of the gable box, and tape them together with masking or painter's tape.
Step 5: Add the Roof to the Log Cabin
Place the roof on top of the box. Trim off any excess overhang from the sides if the roof is too long.
Secure the cake boards in place by gluing them to the four corners where they touch the top of the box.
Step 6: Cut and Glue the Wood Grain Paper
Cut two pieces of wood grain pattern paper (or plain brown paper) the same size as the roof, and glue them on.
Step 7: Give the Cabin a Door and Windows
Glue a door to the front of the cabin and windows to the sides of the cabin. To make the door, we simply cut out a small rectangle from black paper and glued the same wood grain straws around it to create a door frame.
To make the windows, we cut out six small strips of black paper and glued them together to form a window pane shape.
Step 8: Put Your Gift Under the Tree
Feel festive as you place this gift box under the tree, as we guarantee the person who receives it is going to love opening their adorable mini log home.
Tip
This DIY log cabin is not only pretty and unique rustic wrapping, but it could also serve as an adorable gift in its own right to anyone who appreciates clever handmade arts and crafts.