10 Ways to Reuse Old Sweaters: DIY Projects by Fiber Type
The most useful thing to do before picking a project is flip the sweater over and read the label. There are plenty of ways to reuse old sweaters, but fiber content determines which ones will actually work and which will disappoint or fall apart. That single tag settles a lot.
Sweaters with at least 80% wool can be felted in a hot, high-agitation wash, yielding dense fabric you can cut cleanly without hemming, You Make It Simple explains. Blends with significant synthetic fiber often resist felting entirely. Sweaters that won't felt machine-knit cashmere, acrylic, cotton still work well where stretch and texture matter more than density: candle cozies, bag trims, knot pillows, linings.
This guide organizes 10 projects by sweater type first, difficulty second. Use the chooser below, then follow the steps for your best match. The prep section applies to everyone.
Which sweater do you have? A quick chooser
Video of the Day
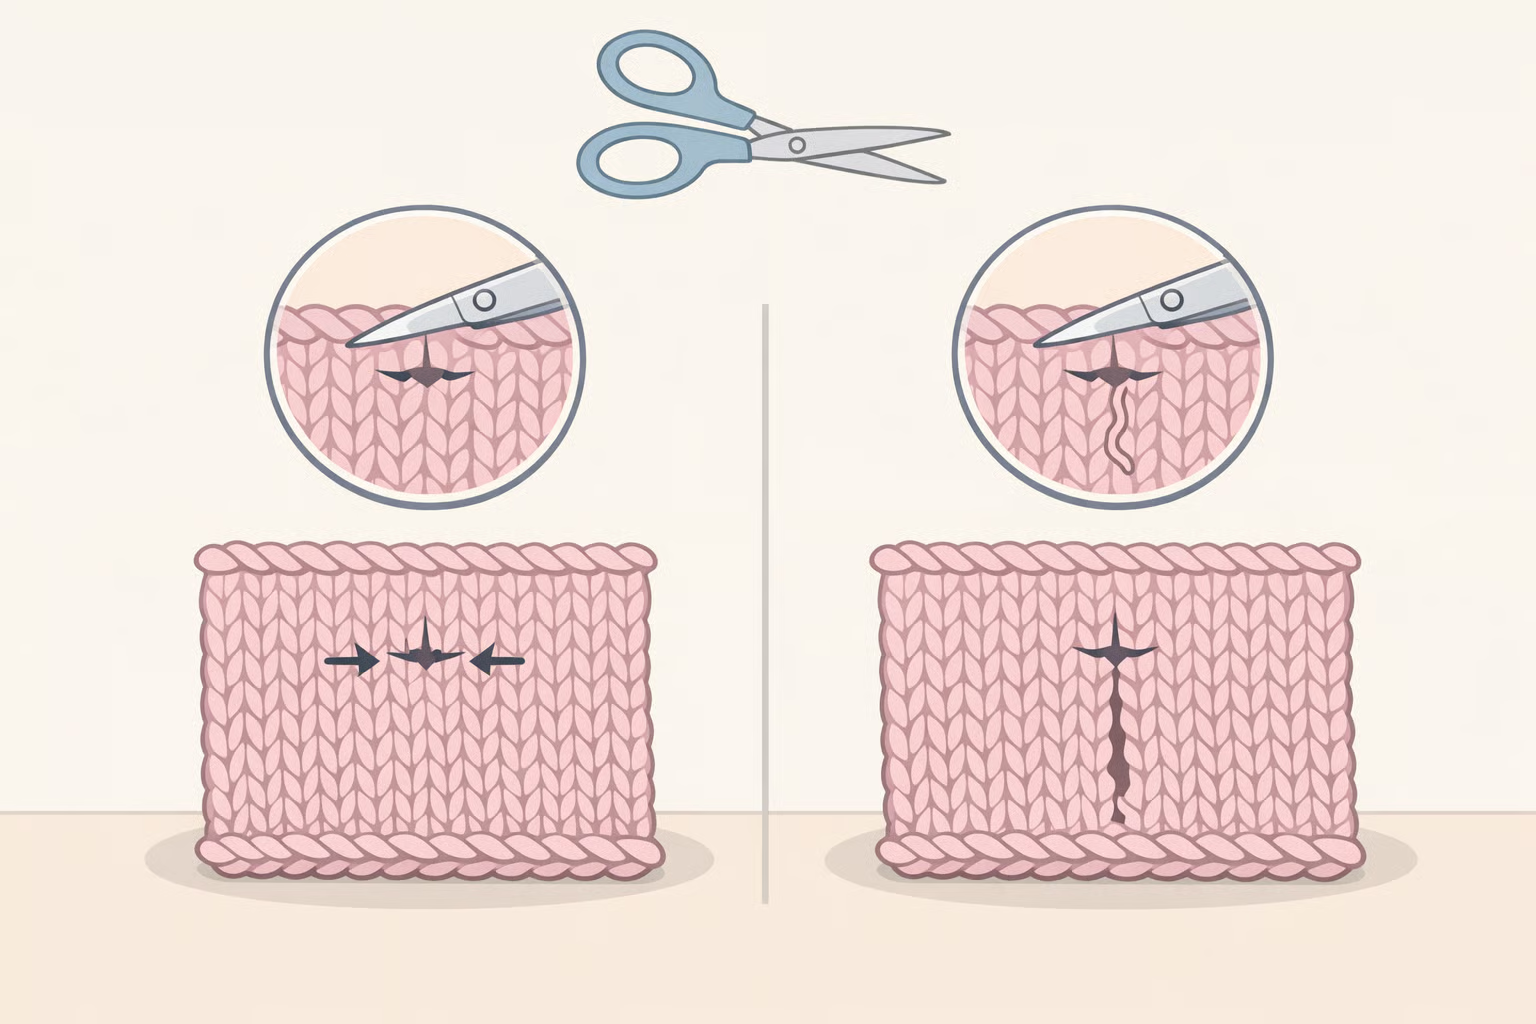
Before picking up scissors, test any sweater you're unsure about: snip a small edge along an inconspicuous seam and watch whether the knit holds or begins to ladder. Machine-knit lambswool and cashmere may stay intact without felting, but not always, Pillar Box Blue notes.
| Your sweater | Best projects | Skip these |
|---|---|---|
| 100% wool (feltable) | Lined mittens, slippers, hats, patchwork throw, dryer balls | Knot pillow (too stiff to knot cleanly) |
| Soft machine-knit wool or cashmere (if a test cut holds) | Knot pillow, hat linings, appliqués | Slippers (too soft for sole wear) |
| Cotton or acrylic blend | Candle cozies, bag trim, bindings, appliqués | Any felted project blends won't felt |
| Scraps and cuffs only | Dryer balls, appliqués, hat brims, bag bindings | Structural projects requiring large panels |
The "Skip These" column is as important as the recommendations. A knot pillow from stiff felted wool won't knot cleanly. Slippers from unfelted cashmere are too soft for sole wear. Candle cozies made without proper clearance from flame are a fire hazard. Each project below flags these mismatches at the relevant point.
One note on the table: candle cozies appear under "cotton or acrylic blend," but they work with almost any sweater that provides stretch and texture. Fiber density is beside the point for that project.
How to use this guide: Find your sweater type, note which projects apply, then read the prep section before picking up scissors. Same prep, every project.
Video of the Day
Before you cut: prep in four steps
Step 1 Source well. The men's section at a thrift store tends to have oversized sweaters that yield more usable flat fabric at the same price as smaller options. Garage and yard sales can price wool sweaters anywhere from 50 cents to $5, You Make It Simple notes. Check the fiber content label before buying. Inspect for moth holes, snags, and stains mark any flaws with masking tape so you don't later cut pattern pieces over them.
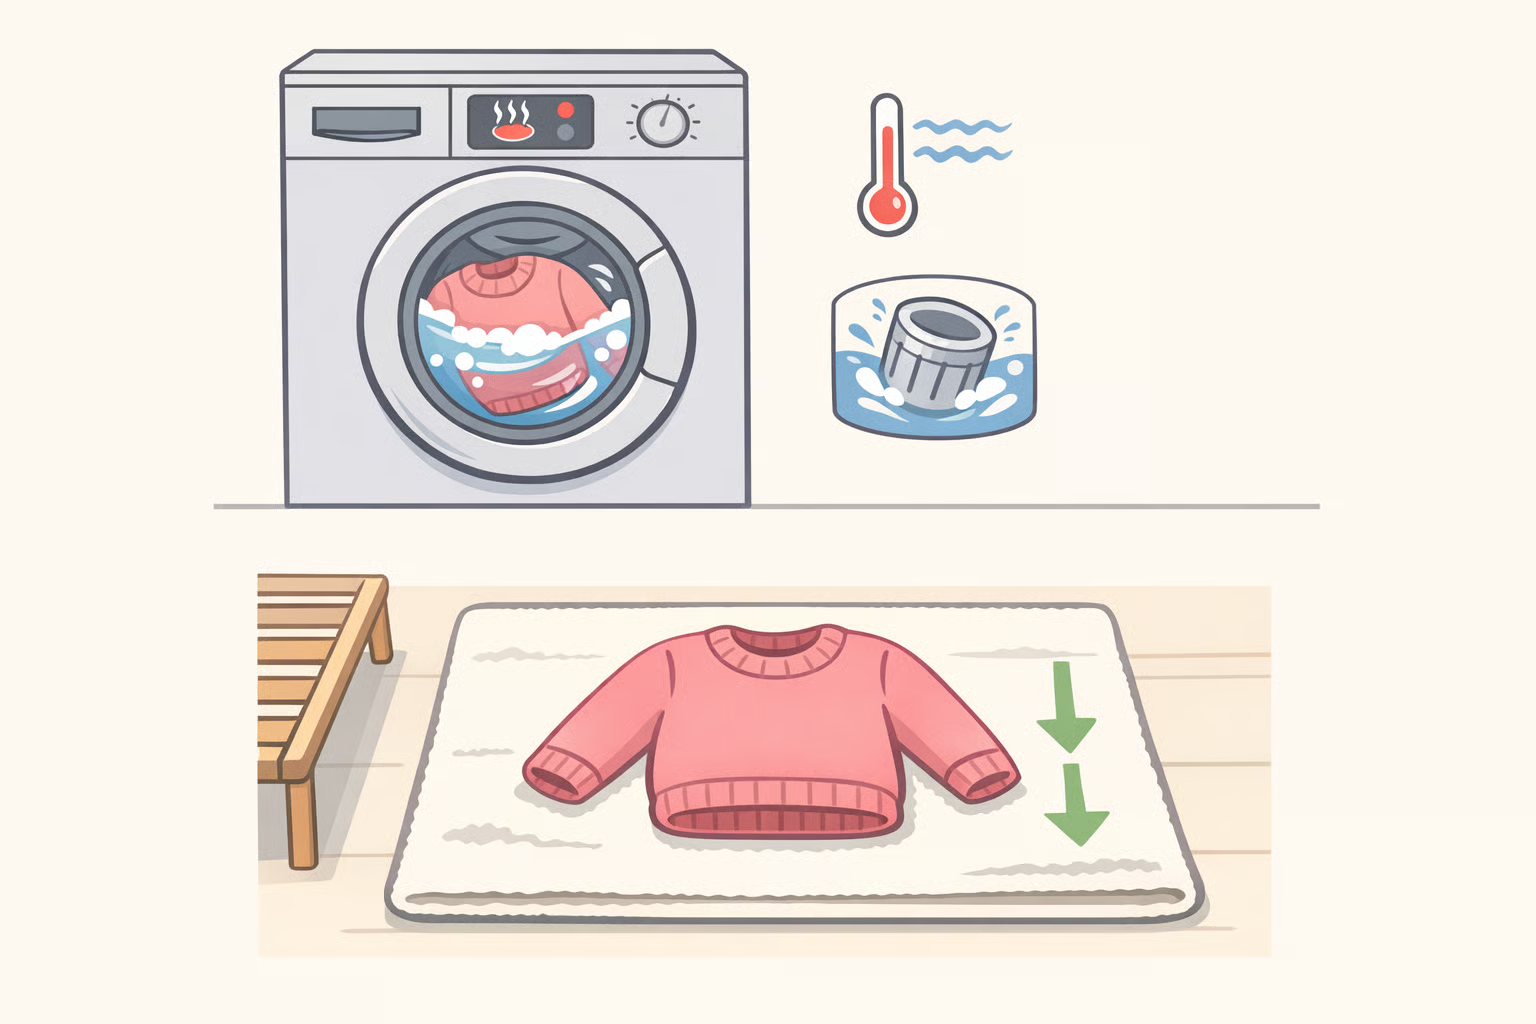
Step 2 Felt if needed. For 80%+ wool destined for structural projects (mittens, slippers, patchwork): sort by color to prevent dye transfer, wash on the hottest setting with high agitation and a small amount of laundry soap, and check the sweater every five minutes to prevent over-shrinking. Lay flat to dry, or tumble dry for additional shrinkage. Skip felting for projects where softness and stretch are the point knot pillows and linings depend on the fabric's natural give, and felting destroys it.
Step 3 Cut for maximum yield. Turn the sweater inside out and use sharp fabric scissors to cut along seams, staying as close to the seam line as possible. Remove sleeves, collar, and any buttons save the buttons and the cuffs. Open each sleeve along its seam to create additional flat panels.
Step 4 Store prepared material properly. Keep cut wool pieces in airtight containers to protect against moths and moisture. Drop a few cotton balls with cedarwood, lavender, or rosemary essential oil inside each bin to deter pests. Store scraps and salvaged cuffs in a separate labeled container you'll reach for them sooner than expected. All prep guidance in this section draws from You Make It Simple.
DIY old sweater projects: choose by fiber type
Felted 100% wool dense, warm, cut-stable
1. Hand-sewn felted mittens (beginner–intermediate)
One felted wool sweater yields 2–3 pairs of mittens, depending on its original size, ocd: obsessive crafting disorder notes.
Trace each hand on paper and add clearance so the fit isn't snug. Cut two pieces per hand from doubled felted wool. Join the layers with a blanket stitch around the perimeter. Colorful felt scraps can be cut into shapes and embroidered onto the back for decoration, Austin Creative Reuse suggests.
Gotcha: The blanket stitch won't hold on fabric that frays. If the wool didn't felt fully, zigzag the edges by machine before joining.
Time: 1–2 hours. No sewing machine required.
2. Lined machine-sewn mittens (intermediate)
Half a yard of properly felted fabric produces roughly four finished mittens enough for two pairs from one large sweater, ocd: obsessive crafting disorder reports.
Cut the mitten body from doubled fabric, leaving at least a 1-inch seam allowance. The thumb gusset is a rectangle twice the length of the thumb opening cut it through one fabric layer only, then sew it into the thumb opening before assembling the mitten body around a separately constructed lining. Reinforce all seams with a zigzag stitch. Roll back the cuff to expose the raw lining edge, fold it over, and hand-stitch in place while stretching slightly to keep the wrist opening flexible. The sweater's original ribbed cuffs make ideal wristbands finished edge, built-in stretch, no additional work needed. Construction sequence from ocd: obsessive crafting disorder; cuff reuse tip from You Make It Simple.
Gotcha: Cut the thumb gusset through one fabric layer only. Cutting through both gives you four pieces when you need two.
Time: About 2 hours. Suitable for advanced beginners and intermediate sewers.
3. Felted slippers (intermediate)
Thick felted wool insulates well underfoot. The sweater's ribbed cuffs work as ankle bands with no finishing required pre-finished edges, built-in stretch, You Make It Simple confirms.
Trace a sole outline and a simple upper from your foot. Cut both from doubled felted fabric and join with reinforced zigzag seams. Attach the salvaged cuff as the ankle band. Add a non-slip suede or fabric sole patch for hard floors.
Gotcha: The felted fabric should feel close to craft felt dense and stiff before cutting. If it still has noticeable stretch, run another hot cycle. Lightly felted material will compress immediately underfoot and won't recover.
Time: 2–3 hours. Machine sewing strongly recommended.
4. Ribbed-edge hat (beginner–intermediate)
A sweater's ribbed bottom band makes a ready-made hat brim finished, stretchy, and visually indistinguishable from a hand-knit edge, You Make It Simple notes.
Cut the ribbed band free from the body. From the felted body fabric, cut a rectangle: width equal to your head circumference, height set by how tall you want the crown to sit. Sew the short edges of the rectangle together to form a loop. Gather or dart the top closed. Attach the ribbed band at the base with the seam allowance facing inward.
Gotcha: If the body fabric isn't fully felted, the crown will fray along cut edges. Felt the sweater first, or serge the cut edges before assembling.
Time: 1–2 hours. Beginner-friendly if the body fabric is fully felted.
5. Patchwork throw or pillow cover (intermediate–advanced)
Felted wool panels cut into uniform squares hold clean raw edges without hemming. The felting eliminates fraying, so exposed seams become a deliberate design detail rather than a finishing problem, You Make It Simple explains.
This is the natural destination for sweaters too damaged in one area to yield a single large project. Cut multiple felted sweaters into uniform squares using a cardboard template size variation becomes obvious once panels are joined, and there's no correcting it at that stage. Sew into rows, then join rows into a finished panel.
Gotcha: Don't eyeball the squares. Make one cardboard template and use it for every cut.
Time: Variable. A lap-sized throw requires a full afternoon of cutting before the first seam.
Soft machine-knit wool or cashmere stretchy, soft, stays intact when cut
6. Knot pillow (intermediate–advanced)
Machine-knit lambswool and cashmere sleeves that don't unravel when cut are exactly the right material for this project. Felted fabric is too stiff to knot cleanly the softness and stretch of unfelted machine-knit wool is what makes the finished piece work, Pillar Box Blue explains.
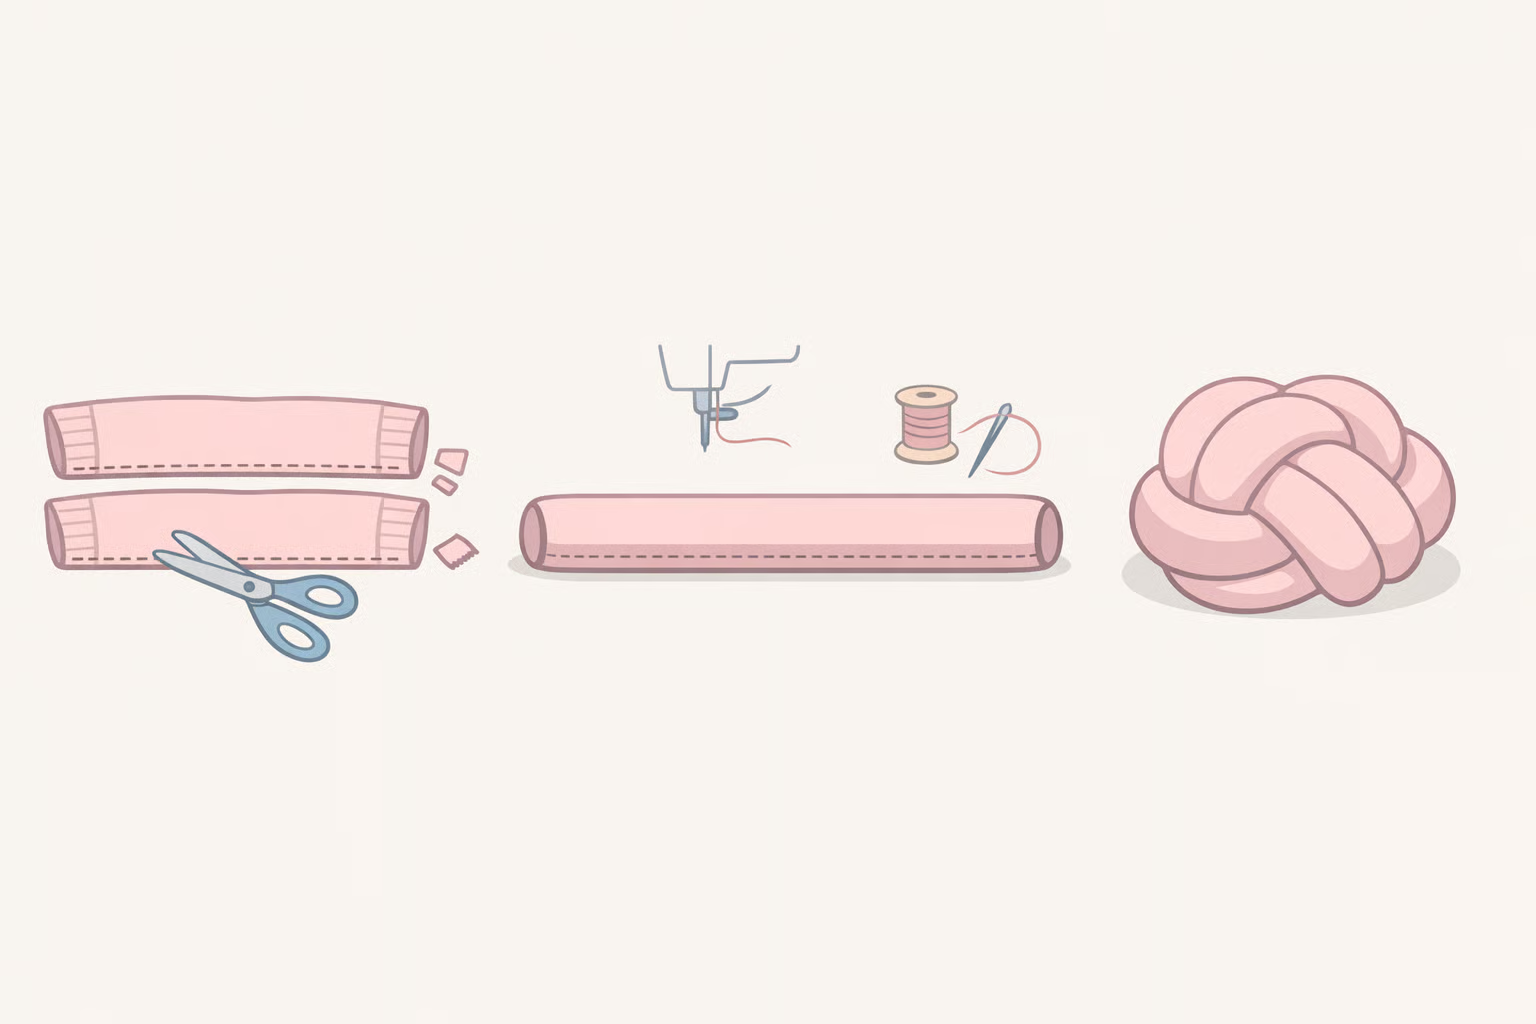
Collect sleeves from approximately six sweaters. Because sleeves taper, each one needs to be sewn and trimmed into a uniform-width tube before joining. Sew sleeves end-to-end into a continuous tube 5–6 meters long, stuff with fiberfill, double the tube back on itself, knot it, then tuck and stitch the two raw ends behind the finished knot, Pillar Box Blue details.
Gotcha: Test a sleeve edge for unraveling before committing to all of them. If it ladders, serging the edges before joining is an option but felting the sweater first would sacrifice the softness the project depends on. Choose one or the other.
Time: A full afternoon with six sweaters to prep.
7. Hat linings and appliqués (beginner)
Cashmere is well-suited for linings, hats, and similar applications where softness is the point, You Make It Simple notes. It's worth salvaging even from damaged sweaters a moth hole in the body doesn't necessarily affect panels cut from undamaged sections.
Cut flat panels from the sweater body to line a knit hat or construct a simple poncho. For appliqués, cut shapes from the fabric and hand-stitch or iron-bond them to garments or bags. Machine-knit wool that holds its cut edge needs no finishing before use as appliqué.
Gotcha: Cashmere and soft lambswool will fray at cut edges if the weave is loose. Test the edge first. If it ladders, zigzag before attaching.
Time: 30–60 minutes depending on application.
Cotton, acrylic, or blend any sweater that won't felt
8. Candle cozies (beginner)
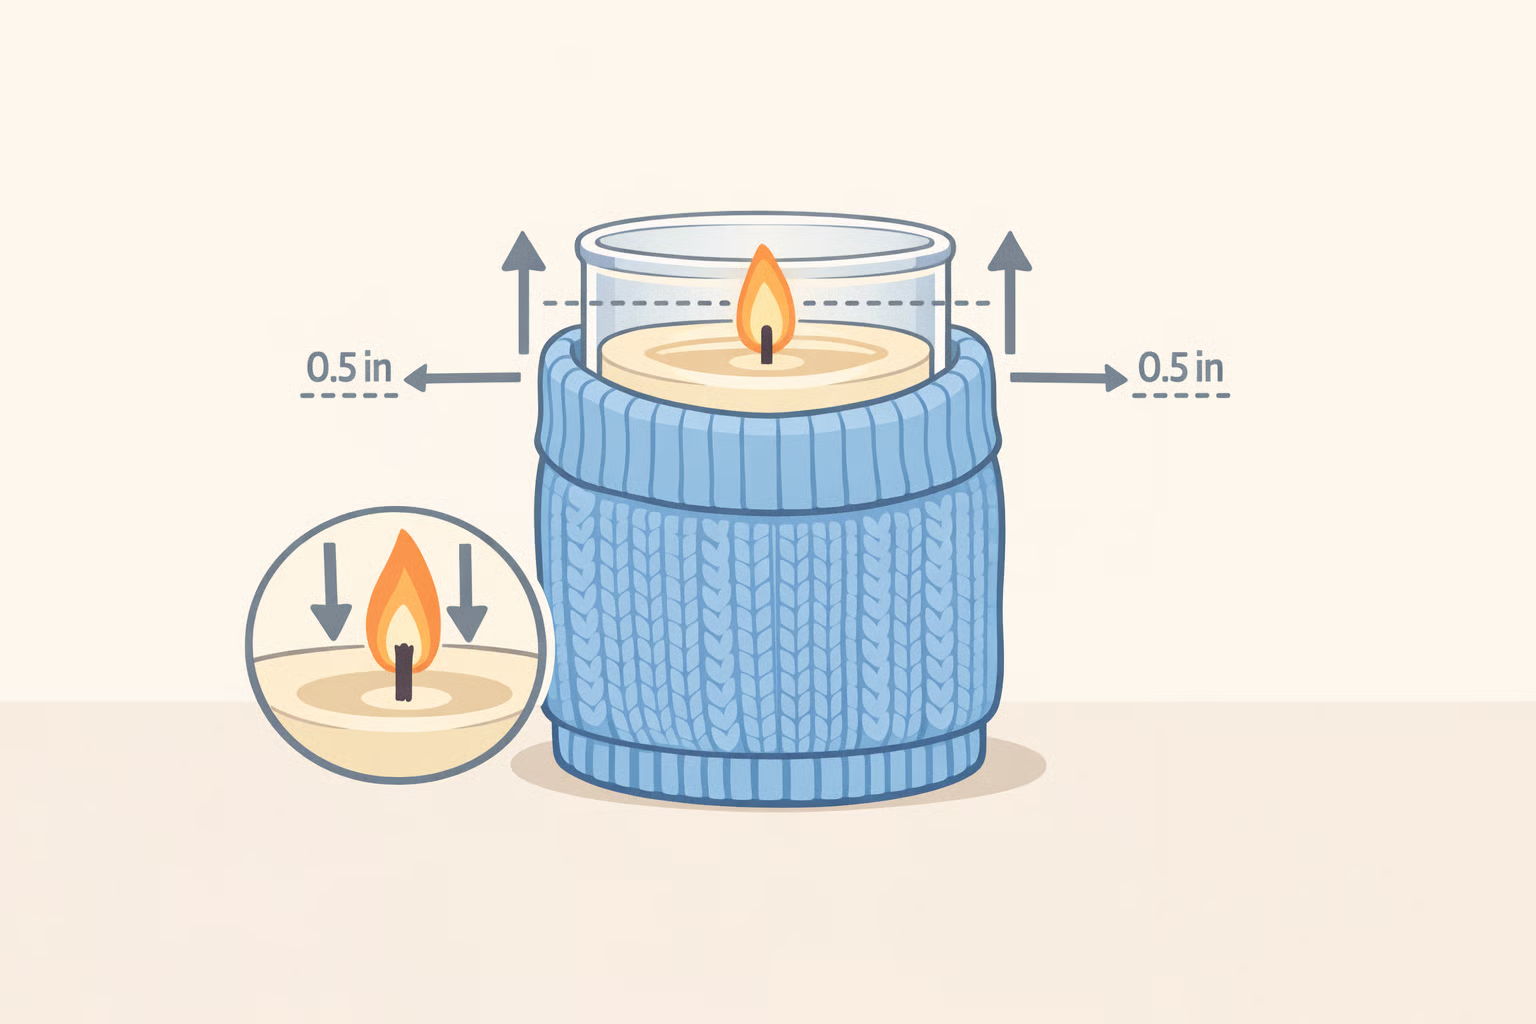
Fiber content matters less here than stretch and texture. Ribbed sweater sleeves are often the easiest starting point they already have structure and stretch evenly around a jar, Ann Gonkhoe notes. Slide a sleeve over a straight-sided glass jar and trim to fit. For a flat panel, cut the fabric to the jar's circumference plus half an inch of overlap, then wrap and secure with fabric glue or a few hand stitches.
Safety read before making. Keep the sweater fabric at least half an inch below the jar's rim, using only glass container candles or votives set in glass. Never use sweater fabric near a pillar candle or any exposed flame. The safest option is a flameless LED candle inside the jar. If using a real candle, trim the wick to a quarter inch before lighting, set the jar on a stable heat-resistant surface away from other flammables, and never leave it unattended. Let the jar cool completely before touching the cozy. All safety guidance from Ann Gonkhoe.
Time: Under one hour. No sewing required.
9. Bag trim and binding strips (beginner–intermediate)
Stretchy cuffs and ribbed edges from cotton or acrylic blends work well as binding tape for bag openings, hood tunnels, or neckline finishes. The stretch does the functional work; fiber density doesn't enter into it. Pre-finished ribbing is ready to use immediately. Body panels need edges finished first, You Make It Simple confirms.
Cut cuffs and ribbed hem sections into strips at the width needed for binding.
Gotcha: Cotton and acrylic panels fray where cut. Zigzag or serge those edges before attaching. Pre-finished cuffs skip this step entirely.
Time: 30–60 minutes per project. A sewing machine helps but isn't required for pre-finished cuffs.
Scraps, salvaged cuffs, and small remnants
10. Dryer balls and appliqués (beginner)
Scraps and remnants that can't support any other project still have two clear destinations, You Make It Simple notes.
Dryer balls: Tightly roll and bind wool scraps into a dense ball, then run through a hot wash cycle to felt them solid. Use 80%+ wool scraps only synthetic fibers won't bind and will come apart in the wash. The finished balls are reusable and replace single-use dryer sheets.
Appliqués: Cut flat scraps into shapes geometric or freeform and hand-stitch or iron-bond onto garments, bags, or patchwork projects. Felted edges hold without any additional finishing. Non-wool scraps that won't survive a hot cycle go here, not into dryer balls.
Time: Under 30 minutes of active work. Felting happens in the wash.
Three paths based on what you have
One large wool sweater: Felt it. Start with project 1 to get familiar with the material, then try project 2 for a more durable lined version. One large sweater can yield 2–3 pairs of mittens, ocd: obsessive crafting disorder confirms, and wool scraps left over go directly into dryer balls.
A soft cashmere or lambswool blend: Cut a sleeve edge first and test for unraveling. If it holds, the sleeves go straight into a knot pillow without felting preserving the softness and stretch the project depends on, Pillar Box Blue explains. Ribbed cuffs become hat brims or bag bindings with no prep at all.
An acrylic or cotton-blend sweater: Skip every felted project. The decision tree is simple: sleeves go around glass jars as candle cozies (LED candle preferred), ribbed cuffs become binding strips, and any flat panels get zigzag-finished before use as appliqués. None of the three require a sewing machine.
Wool felts; stretch-knit softens; non-wool trims and binds. Everything else is just execution.