How to Remove Mildew From Every Surface: Match Cleaner to Material
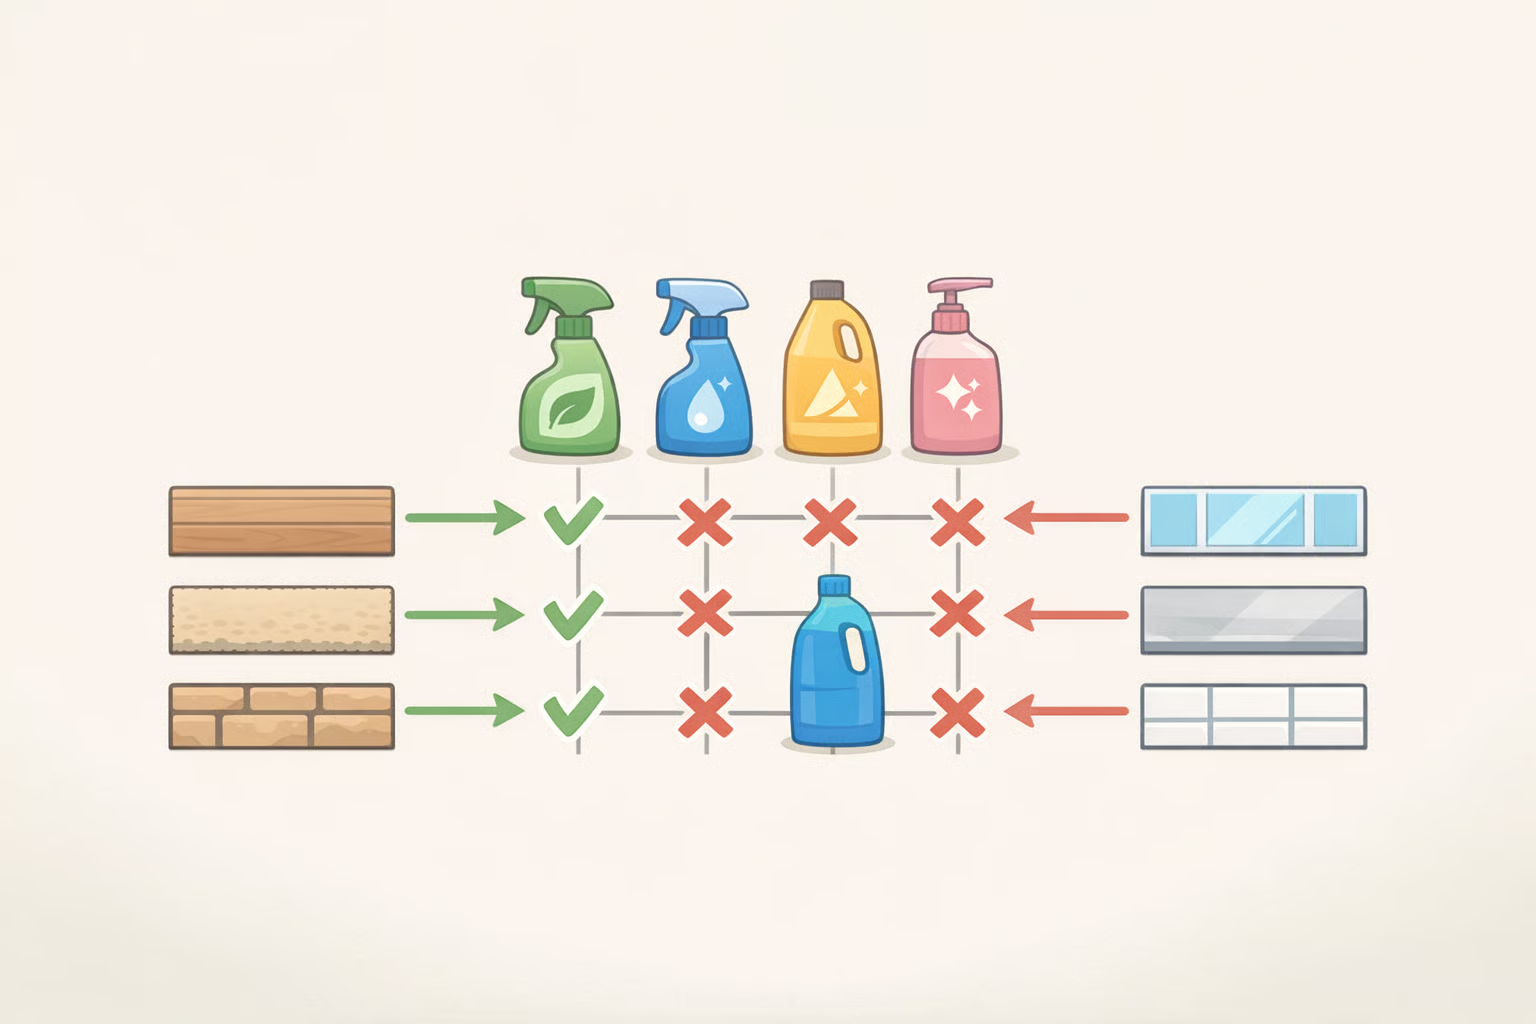
The rule is simple: surface porosity determines the right cleaner. Bleach for tile and glass. Vinegar for wood and drywall. A pH-neutral cleaner for natural stone. Get that match wrong and you're either leaving growth below the surface or damaging the material you're trying to save. This guide walks through how to remove mildew from every surface in your home which cleaner to use, how to apply it, when to throw something out, and when the job is too big to do yourself.
One clarification up front: this guide treats household mildew and small, visible surface mold the same way for cleaning purposes. Both are fungal growth that responds to the same cleaners at the household scale. The EPA draws the DIY line at roughly 10 square feet about a 3-by-3-foot patch. Anything larger, hidden behind walls, or tied to ongoing water intrusion is a remediation job, not a cleaning job.
Before you start: safety rules and when not to DIY
Video of the Day
Who should not clean mildew themselves: People with asthma, respiratory conditions, or chemical sensitivities should avoid direct exposure to both bleach fumes and mold spores. Indoor Humidity notes that vinegar is generally better tolerated by sensitive individuals than bleach, but neither is risk-free in an enclosed space. Children and pets should be kept out of the area until surfaces are fully dry and aired out.
When DIY is the wrong call:
- The affected area is larger than roughly 3 feet by 3 feet Harvard Health and the EPA both set this as the threshold for professional consultation
- You can smell mold but cannot find it growth may be inside walls or under flooring
- Mildew returns to the same spot repeatedly after cleaning
- Your HVAC system may be involved; the EPA warns explicitly not to run a potentially contaminated system, as it can distribute spores throughout the building
Required gear for any surface:
- Rubber gloves and eye protection
- Open windows and an exhaust fan running throughout the job
- One cleaner at a time never mix bleach, vinegar, or hydrogen peroxide with each other or with ammonia-based products; combining bleach and vinegar creates chlorine gas, per Indoor Humidity, and mixing vinegar with hydrogen peroxide in the same container produces irritating compounds, per Mold Removal Lab
- If you want to use two different cleaners on the same surface, rinse thoroughly between applications and wait at least 30 minutes
- Test any cleaner on a small, inconspicuous area first this matters especially on fabrics, finished wood, and stone
Video of the Day
Step 1: identify the surface and choose the right cleaner
Before opening a bottle, determine what you're cleaning.
Non-porous surfaces (ceramic tile, glass, sealed plastic, porcelain, sealed countertops) don't absorb moisture or fungal growth below the surface. A powerful oxidizer like bleach or hydrogen peroxide works fast and thoroughly. Porous surfaces (wood, drywall, unsealed grout, fabric) absorb both moisture and fungal growth deep into the material. Only a cleaner that can penetrate will reach the problem which is why bleach fails on drywall even when it looks like it's working.
Quick decision reference:
| Surface | Use this | Avoid this | Cleaning approach |
|---|---|---|---|
| Ceramic tile, glass, sealed plastic, porcelain | Bleach solution or 3% hydrogen peroxide | Surface application, short contact time | |
| Unsealed or stained grout | Undiluted white vinegar | Bleach alone | Longer contact time, scrub well |
| Wood trim, window frames, subflooring | Undiluted white vinegar | Bleach | Long contact time; dry thoroughly after |
| Painted drywall | Undiluted white vinegar | Bleach | Gentle scrub; staining may remain |
| Fabric, shower curtains, washable upholstery | Undiluted white vinegar | Bleach (most fabrics) | Soak, scrub, launder, dry fully |
| Laminate, painted trim, ceilings | Diluted bleach or hydrogen peroxide (test first) | Undiluted bleach | Light application; check for lifting or discoloration |
| Natural stone (marble, granite, slate) | pH-neutral stone cleaner | Both bleach and vinegar | Consult manufacturer; acids and oxidizers can etch stone |
| Metal fixtures | Bleach with brief contact time | Vinegar (repeated use corrodes) | Rinse quickly; don't let bleach sit |
| Carpets, ceiling tiles, heavy upholstery | Consider disposal | Most cleaners inadequate | See disposal guidance in Step 3 |
A note on hydrogen peroxide: The 3% solution available at any pharmacy sits in a practical middle ground stronger antimicrobial action than vinegar on non-porous surfaces, less caustic than bleach, and lower fume output. Mold Removal Lab positions it as the stronger non-porous surface option when bleach is not preferred. Apply undiluted, let it sit 10–15 minutes, scrub, and rinse. Be aware it can lighten porous materials if misapplied, per the same source.
Step 2: how to clean hard, non-porous surfaces tile, glass, sealed countertops, and plastic
Bathrooms concentrate moisture, heat, and organic residue. Hard tile and glass are where bleach performs best, and the job is straightforward.
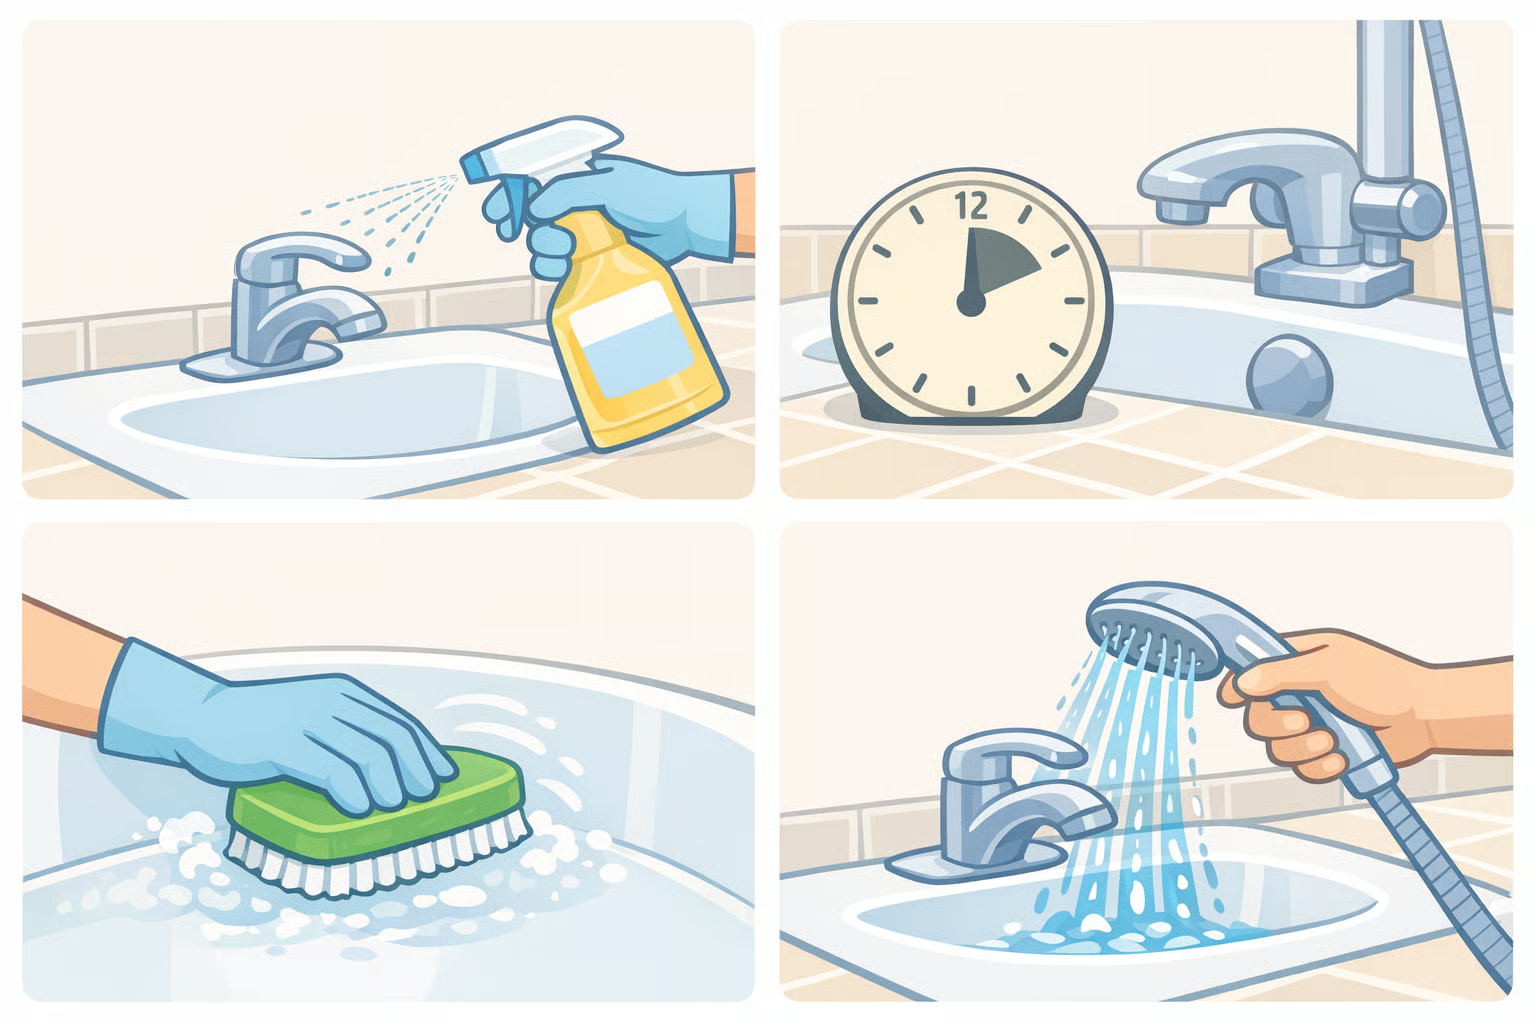
For ceramic tile, glass shower doors, porcelain, and sealed hard surfaces:
- Put on gloves and eye protection. Open the window and run the exhaust fan before opening the bleach.
- Mix one cup of household bleach into one gallon of water the proportion Harvard Health cites from CDC guidance for scrubbing mold off hard surfaces. Pour into a spray bottle.
- Spray the affected surface and leave it for 10–15 minutes without scrubbing. Wiping it off early cuts effectiveness significantly. At standard household concentrations (3–6%), bleach can eliminate over 99% of surface mold in that window on non-porous materials, per Indoor Humidity.
- Scrub with a stiff brush, rinse thoroughly with clean water, and dry the surface completely.
For unsealed or heavily discolored grout:
Grout is semi-porous. Bleach may lighten the stain without clearing the growth below it. Switch to undiluted white vinegar: spray generously, wait at least one hour overnight for stubborn cases then scrub and rinse. The acetic acid continues working as long as the surface stays wet, per Indoor Humidity. If both approaches fail, resealing or re-grouting is sometimes the more practical fix.
For laminate, painted trim, and ceilings:
Apply a diluted bleach solution (same proportions as above) or hydrogen peroxide, test a small area first, and keep contact time short. Painted surfaces can lift or discolor under concentrated chemicals or prolonged exposure. Use a cloth rather than a spray to control how much is applied, and dry completely after rinsing.
Visible growth and active odor should be gone after treatment. Staining may remain on grout or painted surfaces that's cosmetic, not a sign the cleaning failed. If musty smell or visible growth returns within two weeks, the moisture source is still active.
Step 3: how to clean mildew on porous and non-porous surfaces wood, drywall, fabric, and what to throw out
Porous materials require patience. The goal is reaching the growth below the visible surface, not just clearing what you can see.
For painted drywall and interior walls:
- Do not use bleach. On porous materials it works only on the visible surface layer while leaving fungal growth intact below Indoor Humidity rates it "poor (surface only)" on drywall and wood.
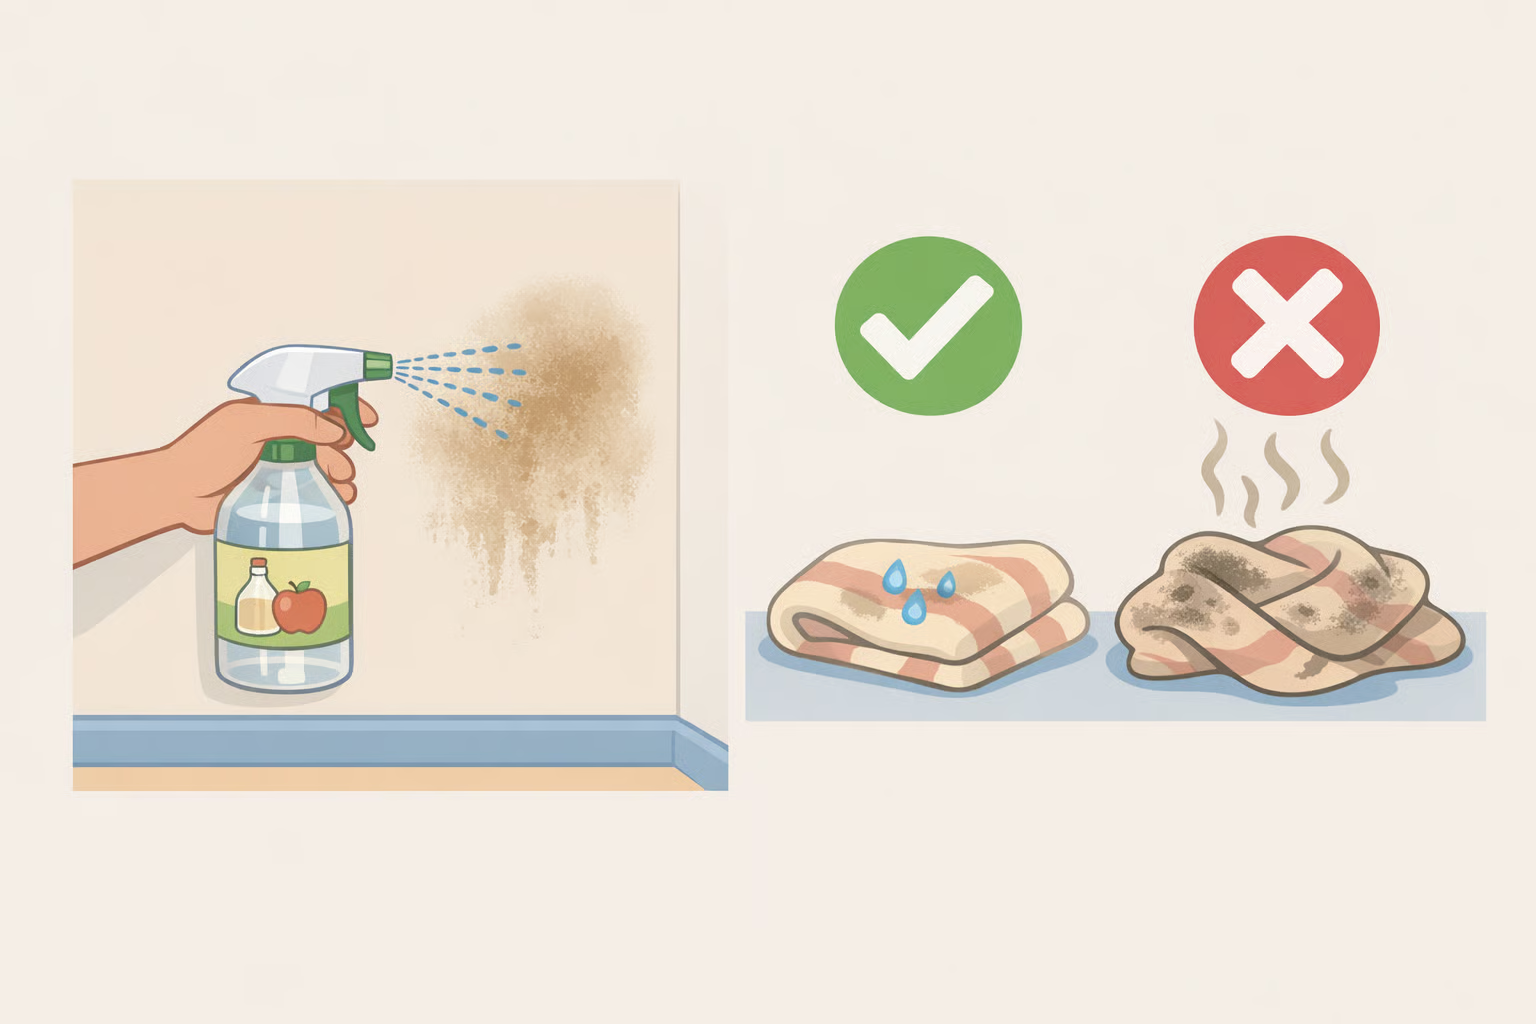
- Fill a spray bottle with undiluted white distilled vinegar (5–6% acetic acid). Don't dilute it; that reduces effectiveness.
- Spray the affected area generously. Wait at least one hour without wiping overnight for persistent growth.
- Scrub with a brush, wipe with a damp cloth, and dry completely. Residual moisture is a setup for regrowth.
- Once fully dry, paint over any remaining stain. Do not paint over active mildew as a substitute for cleaning the CDC specifically flags painting over moldy surfaces as inappropriate remediation that worsens the problem.
White vinegar can eliminate roughly 82% of mold species, per Indoor Humidity not all of them. Some species require longer exposure, stronger intervention, or professional remediation. If mildew returns to the same wall spot after a thorough treatment, the growth is likely deeper than the surface or the moisture source is still active.
For wood trim, window frames, and subflooring:
The same vinegar method applies. Apply undiluted, allow at least one hour of contact time, scrub, then dry the surface thoroughly and quickly. Wood is particularly moisture-sensitive: leaving it wet after treatment creates better conditions for regrowth than you started with, which Mold Removal Lab flags as one of the most common mistakes on porous surfaces. If you suspect mildew has penetrated deeply into structural wood, surface cleaning is not enough that's remediation territory.
For fabric, shower curtains, and washable upholstery:
- Take the item outside or work near an open window.
- Spray with undiluted white vinegar and let it sit for 30–60 minutes.
- Scrub with a soft brush, then launder on the hottest water cycle the care label permits.
- Dry completely in sunlight if possible. Mildew cannot survive on a truly dry surface.
Bleach damages most fabrics even when diluted. Reserve it for white cotton where the care label explicitly permits chlorine bleach.
When to discard instead of clean:
Some porous items cannot be adequately cleaned. Harvard Health specifically names carpets and ceiling tiles as materials that often cannot be thoroughly cleaned once mildew has set in. The practical test: if the item is heavily absorbent, if growth has penetrated through multiple layers, or if the item cannot be fully dried after treatment, dispose of it. Cleaning the surface of a mildewed mattress while the interior stays damp is a cosmetic fix with a health cost attached.
Step 4: dry the surface and fix the moisture or the mildew returns
Cleaning is the easy half of the job.
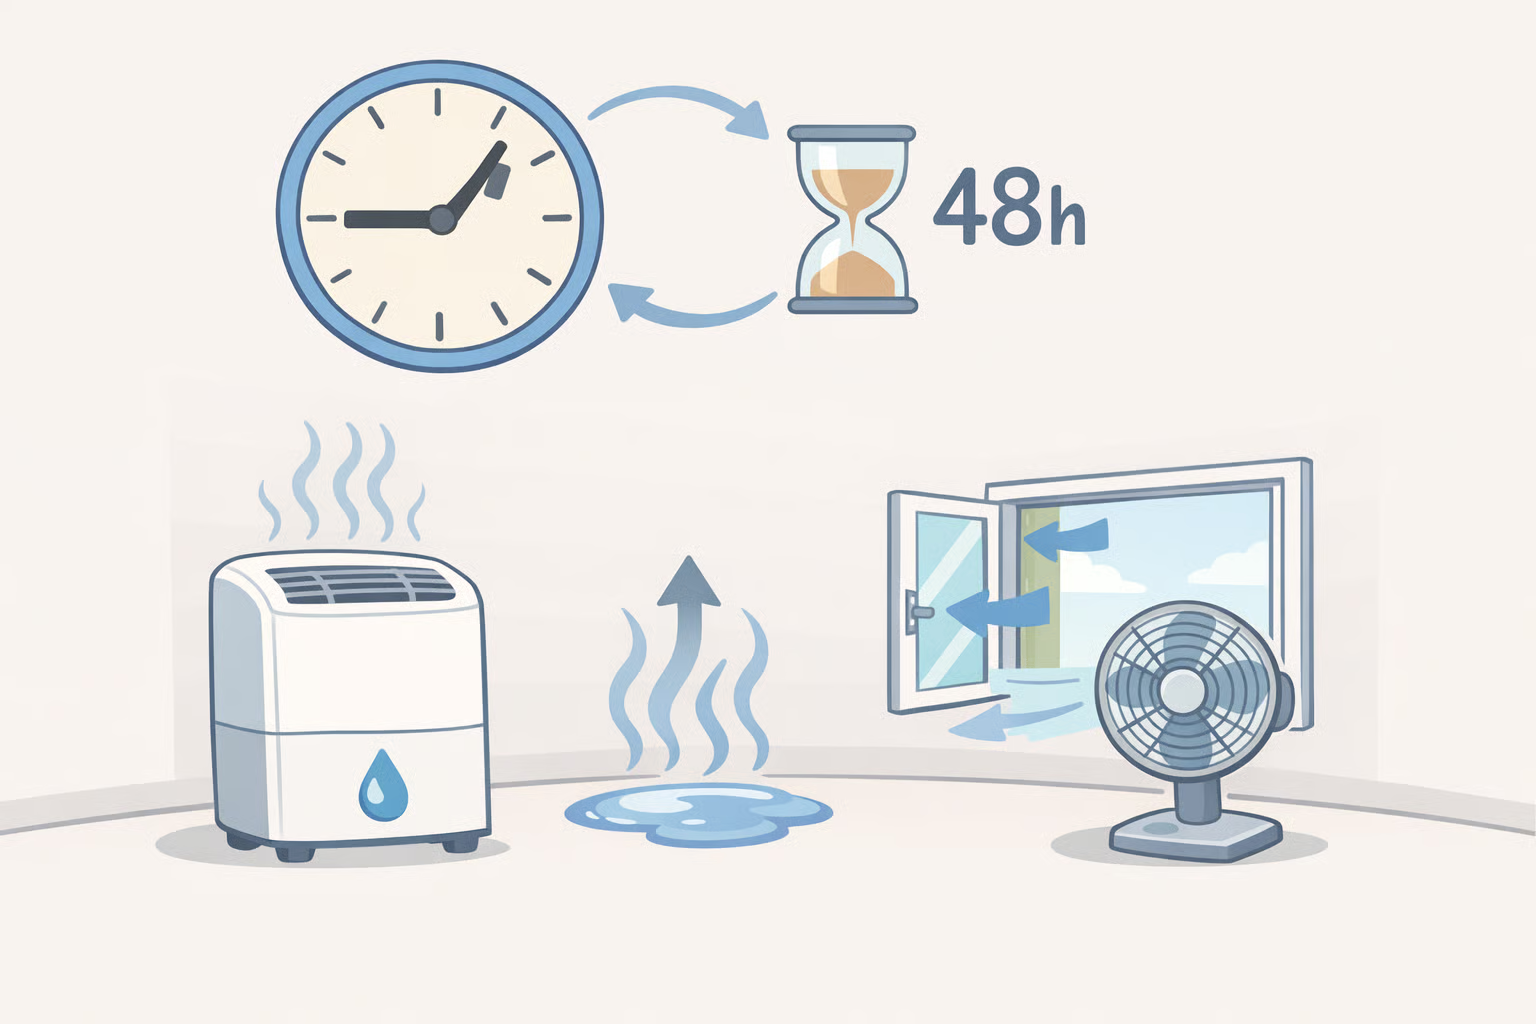
Mildew and mold require moisture to survive. The CDC treats drying water-damaged materials within 48 hours as a remediation requirement, not a suggestion materials that stay wet past that window are at high risk of developing mold regardless of what was cleaned beforehand. The EPA reinforces this point: repairs that stop water intrusion should happen before or alongside cleanup, not after.
For ongoing humidity control, Harvard Health recommends keeping indoor humidity between 30% and 50%. When it exceeds 60%, a dehumidifier is the right response. Temperature matters too: according to Indoor Humidity, surfaces below 50°F can see kill rates reduced by as much as 40%, making adequate warmth and ventilation a practical factor, not just a comfort one.
Check the treated area every few days for one to two weeks. If mildew reappears in the same spot, the moisture source hasn't been resolved. That's the problem to address not the choice of cleaner.
When to stop cleaning and call a professional
A few situations fall outside the scope of DIY work, regardless of what's in the cleaning aisle.
Growth larger than that 3-by-3-foot threshold, mold you can smell but cannot locate, or mildew that keeps returning to the same spot after thorough treatment all point to a problem that surface cleaning cannot solve. The same goes for any HVAC involvement the EPA is explicit that a potentially contaminated system should not be run, because it will spread spores through the entire building. At that point, a licensed remediation contractor with mold-specific experience is the right call, not a larger spray bottle.
Keep indoor humidity in the 30–50% range, fix leaks promptly, seal grout lines annually to slow future penetration, and monitor cleaned areas for one to two weeks. For larger or recurring problems, the EPA's residential mold guidance is a reliable starting point before contacting a professional.