Frozen Mississippi mud bars recipe: step-by-step guide
This guide walks you through building frozen Mississippi mud bars from scratch: a three-layer dessert that combines a baked brownie with two no-bake, chill-set layers, assembled in stages and frozen overnight. The overnight freeze is not optional. Neither is the staging. Both are also what make this worth the effort.
The Kitchn published the original frozen bar concept today, describing it as a handheld riff on Mississippi mud pie: fudgy brownie, creamy chocolate filling, and a soft marshmallow top, sliceable straight from the freezer. Serious Eats captured the appeal of the classic pie last November: built for anyone who looks at a chocolate dessert and wishes it had more chocolate, with three layers that each bring their own texture to a cumulative richness. The bar format preserves that structure while making it portable and summer-practical.
The key departure from the original pie: the pudding top becomes a marshmallow layer here, and everything goes into the freezer rather than just the refrigerator. That shift changes the timeline, the technique, and the slicing approach, all covered in sequence below.
What you'll need before starting: a 9x13-inch baking pan, parchment paper, a food processor, a hand or stand mixer, an offset spatula, and cleared freezer space. Active work runs across one evening; plan for chilling, baking, and freezing to stretch roughly 10 to 12 hours total before bars are ready to cut.
How the layers work and why the build order matters
Video of the Day
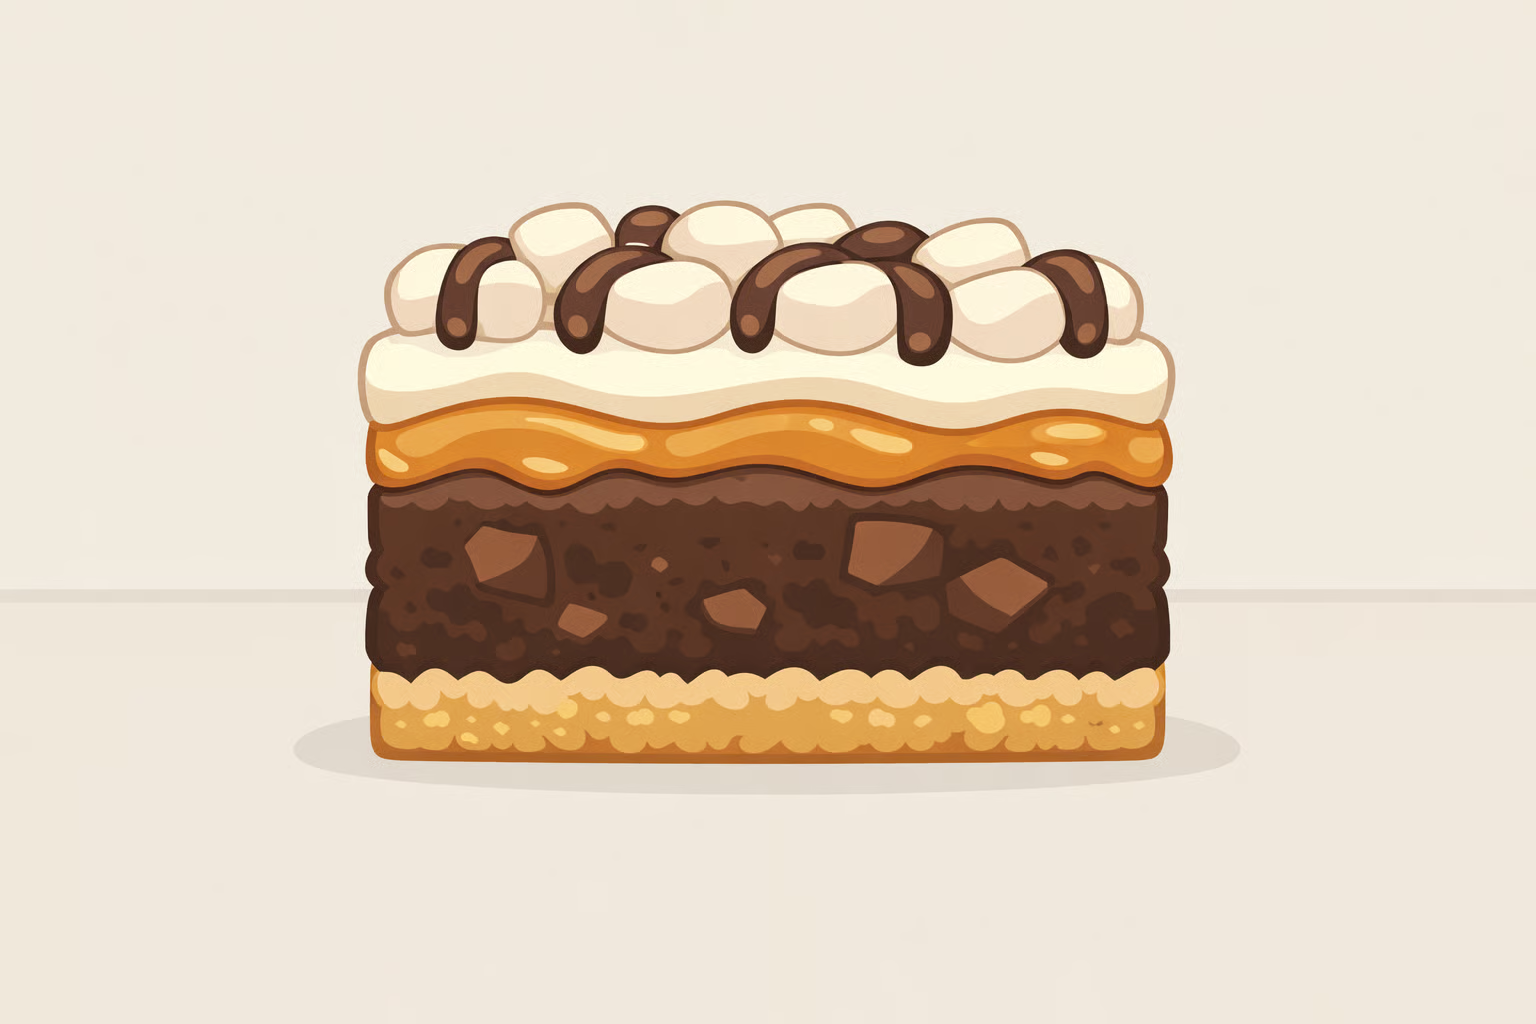
Three layers: one baked, two chilled. Understanding what each does and why the sequence is fixed makes the step-by-step faster to execute without second-guessing.
The crust is chocolate graham cracker crumbs mixed with melted butter, pressed flat, and frozen before brownie batter goes on top. Serious Eats confirmed through testing last April that freezing a buttered cookie crust for 15 minutes sets it into a uniform, sturdy foundation with no dedicated oven step required. The brownie bakes directly on top of the frozen crust, which firms it further. No redundant baking needed.
The brownie layer is the only baked component, and the one with the highest failure risk. It needs to be fudgy but not dense, light enough to yield under a bite even when frozen solid. Serious Eats testing found last November that combining roughly equal parts butter (saturated fat) and vegetable oil (unsaturated fat) produces the right chew: tender and yielding, not hard or greasy at cold temperatures. Whipping the eggs until tripled in volume before folding them into the batter introduces enough air to prevent the layer from becoming brick-like once frozen. That step is not optional for a freezer-destined brownie.
The chocolate filling is a no-bake layer built from melted bittersweet chocolate, butter, and sweetened condensed milk. The condensed milk is the setting agent: Serious Eats notes that it firms up when cold into a fudgy, sliceable texture without any cooking. Use chopped chocolate bar or baking wafers, not chips. Chips contain stabilizers like soy lecithin that prevent full melting and produce a grainy filling, as Serious Eats flagged last November.
The marshmallow layer is whipped cream folded with marshmallow fluff. This is the adaptation that separates these bars from the original pie, which uses cooked chocolate pudding on top. Spread it cold over the fully set filling and freeze overnight; the aerated, fat-rich mixture holds its texture better in the freezer than a water-based pudding layer would.
On flavor balance: salt and espresso powder appear in both the brownie and the filling. Serious Eats notes that espresso enhances chocolate's fruity notes while vanilla and salt bring the layers together; without them, each layer reads flat at this level of richness. That finding holds across formats: Serious Eats' s'mores brownies, published last August, use espresso in the brownie batter specifically to prevent the chocolate from tasting cloying. Keep both in every layer that calls for them.
Video of the Day
Frozen Mississippi mud bars: step-by-step method
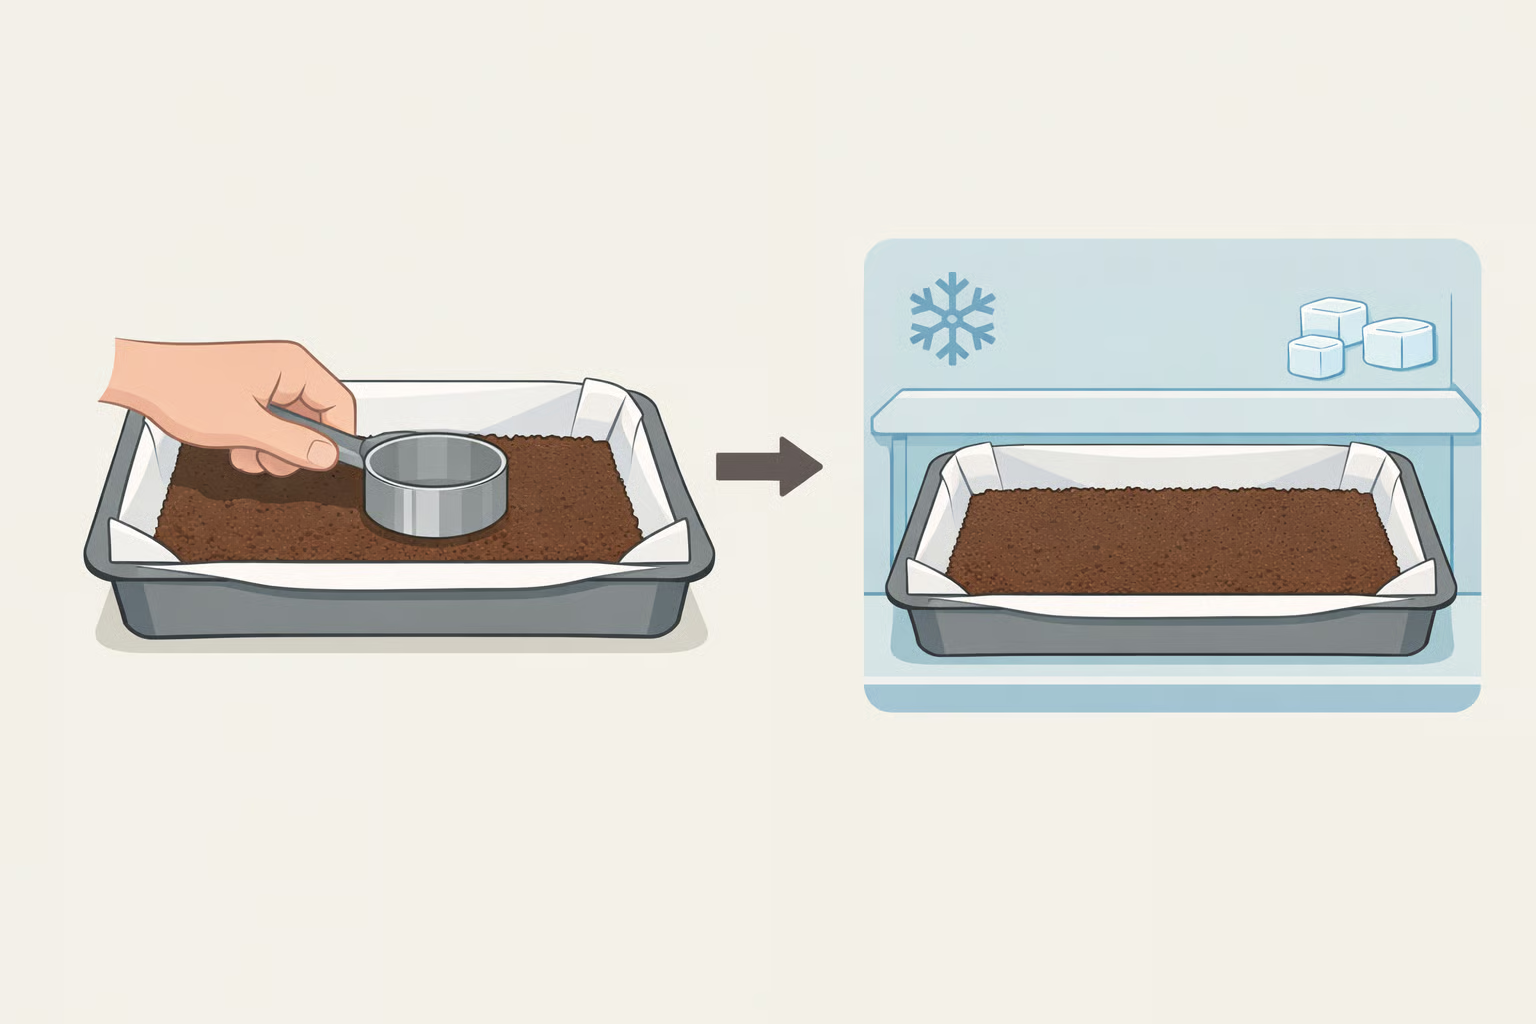
Step 1: Line the pan and make the crust.
Line a 9x13-inch pan with parchment, leaving a 2-inch overhang on both long sides. Pulse chocolate graham crackers in a food processor until you have fine, uniform crumbs, about 2 cups. Stir in 6 tablespoons melted unsalted butter and a pinch of salt until the crumbs clump when pressed. Spread into the pan and press firmly into a flat, even layer using a flat-bottomed measuring cup. Edges and corners need the same pressure as the center. Freeze for at least 15 minutes, until the surface feels solid when tapped.
Gotcha: An uneven crust creates uneven bars. Thin spots crack when sliced; thick spots stay tough. Take the extra minute on the edges.
Step 2: Make and bake the brownie layer.
Preheat the oven to 350°F (175°C). Melt 8 oz chopped bittersweet chocolate with 6 tablespoons unsalted butter. In a separate bowl, beat 4 eggs and 1¼ cups sugar with a hand mixer until the mixture has tripled in volume and looks pale, 3 to 4 minutes. Serious Eats identifies this whipping step as what produces a brownie light enough to yield when bitten cold, rather than requiring a knife to work through. Skipping it produces a dense slab that becomes nearly impenetrable once frozen.
Fold in 3 tablespoons vegetable oil, the chocolate mixture, then the dry ingredients: 3 tablespoons cocoa powder, ¾ cup flour, 1 teaspoon espresso powder, 1 teaspoon vanilla, ½ teaspoon salt. Pour over the frozen crust and bake until a toothpick comes out with moist crumbs attached. Serious Eats clocks a comparable brownie at about 18 minutes; allow up to 22 in a 9x13 pan.
Gotcha: Pull at moist crumbs, not a clean toothpick. The brownie firms significantly in the freezer; overbaking turns it dry and hard when cold. Cool on a wire rack for at least 1 hour. The brownie must be fully at room temperature before the filling goes on, even slight warmth causes the filling to sink rather than set as a distinct layer.
Step 3: Make the chocolate filling and spread it over the cooled brownie.
Melt 10 oz chopped bittersweet chocolate (70% cacao) with 4 tablespoons unsalted butter in a microwave-safe bowl, stirring every 30 seconds. Whisk in one 14-oz can sweetened condensed milk, 1 teaspoon espresso powder, 1 teaspoon vanilla, and ¼ teaspoon salt until smooth and glossy. Pour over the fully cooled brownie and spread level with an offset spatula. Refrigerate uncovered until set, about 1 hour; it should not jiggle when the pan is nudged.
Gotcha: Fully set means firm to a light touch throughout, not just around the edges. When in doubt, wait 20 more minutes. A layer that looks set at the edges but still moves in the center will marble into the marshmallow topping.
Step 4: Make the marshmallow layer and top the chilled filling.
Beat 1 cup heavy cream, 2 tablespoons powdered sugar, and 1 teaspoon vanilla to medium-stiff peaks. Fold in ¾ cup marshmallow fluff until just combined, stopping before the mixture deflates. Spread evenly over the cold, set chocolate layer, aiming for roughly ½ inch thickness. The cold filling below is what keeps the marshmallow from sinking or bleeding into the layer beneath it; do not skip the refrigeration step before this one.
Cover loosely with plastic wrap and freeze overnight, minimum 8 hours. Three hours produces a messy cut and flavors that haven't fully integrated. Eight hours produces clean, distinct layers.
Step 5: Slice and serve.
Lift the slab from the pan using the parchment overhang and set on a cutting board. Let rest at room temperature for 3 to 5 minutes, just enough to prevent the crust from shattering, not enough to soften the layers. Use a sharp chef's knife, rinsing under warm water and wiping the blade between every cut. Serious Eats makes this same call for layered chocolate-and-marshmallow bars: a clean knife on each pass produces sharper, cleaner edges. Slice into bars roughly 2x3 inches; the 9x13 pan yields about 20 to 24 bars. Return to the freezer on a parchment-lined sheet if not serving immediately.
Storage, serving, and what to expect
Store finished bars in a freezer-safe airtight container with parchment between layers to prevent sticking. Serious Eats confirms that comparable fat-rich, no-bake chocolate bars can be tightly wrapped and frozen for up to a month without quality loss.
Serve directly from the freezer. No thaw time required. The marshmallow top is the most tender part of the bar; aerated layers soften faster than dense chocolate ones, so plan to serve within a reasonable window once bars leave the freezer.
The crust snaps, the brownie yields with chew, the chocolate filling is dense and fudgy, and the marshmallow layer compresses without resistance. The Kitchn compares the experience to childhood ice cream sandwiches with more going on in each bite, which captures the texture contrast accurately, if not quite the intensity. These are rich. One bar is a full dessert portion for most people, which makes a 9x13 slab the right call for a gathering. Make it the day before, keep it frozen until 5 minutes before serving, and slice to order.