Things You'll Need
1/4-inch-diameter dowel
Small sharp knife
Fine-point permanent marker
Fancy party toothpicks
Thin cotton fabric in a small plaid print
Scissors
Ruler
Clear tape
Sewing machine
Thread
Craft glue
Cotton or quilt batting
Fine cord

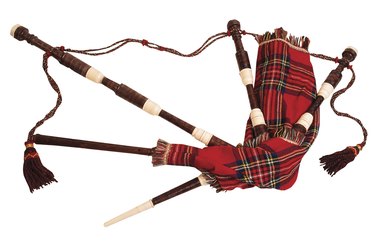
You can make a miniature pretend bagpipe for your dollhouse or diorama. Craft a tiny set of bagpipes in 1:12 scale to place with the drums in the weapons room of a tiny Scottish castle. Bagpipes could be a great addition to the music room in a Victorian mansion as well, and could add a well-traveled note to the den in a modern dollhouse.
Step 1
Cut a 1 1/2-inch piece of 1/4-inch-diameter dowel. Whittle down one end so that the whole piece tapers smoothly down to half the original size on that end. This is the canter, the piece the player holds in his hands. Use a fine-point permanent marker to draw the holes down one side.
Video of the Day
Step 2
Cut 3/4 inch off the turned end of two fancy party toothpicks, the kind that look as if they were turned on a lathe. These will be the tenor drones. Use a whole toothpick for the bass drone. Cut 1 1/4 inch off the pointed end of a toothpick to make a mouthpiece.
Step 3
Cut two, 3 1/2-inch-by-3-inch ovals from thin cotton fabric. Use a small-scale plaid print to imitate tartan.
Step 4
Lay one oval right side up on a table so that the longest edge is closest to you. Lay the second oval right side down on top of it. Lay the canter on top of the oval, so that it lies across the oval and the smaller end touches the left side. Lay the three drones on the oval so that the plain ends are spaced along the right side, with the end touching the edge. Place the longest drone closest to the top and the shorter ones 1/2 inch and 1 inch below it. Place the thicker end of the mouthpiece at the top of the opposite side, touching the edge. All the wooden pieces should have one end touching the edge of the oval and the other end extending into the circle. Hold the toothpicks in place with a short strip of clear tape.
Step 5
Set the sewing machine to sew a straight stitch with a small stitch length.
Step 6
Sew around the edge of the oval, 1/2 inch from the edge. Sew slowly and carefully over the toothpicks, adjusting their position slightly so that the needle goes down on each side of them rather than hitting them. Leave a 1 1/2-inch hole in the bottom of the oval for turning.
Step 7
Clip the seam allowance every 1/4-inch around the edge of the oval. The seam allowance is the fabric that extends beyond the seam. Cut close to the seam without cutting it. Remove the tape holding the toothpicks. Turn the bagpipe right side out, carefully pushing the pipes through the hole as you turn so that the pipes are on the outside. Place a tiny drop of craft glue at the spot where the toothpicks touch the fabric to secure the toothpicks. Allow the glue to dry for an hour.
Step 8
Stuff a tiny bit of cotton or quilt batting into the bag to give it a bit of shape. Do not use enough to completely fill the bag. Hand sew the opening closed.
Step 9
Tie a bit of thin cord around the middle of the tall drone and the ends of the smaller ones, so that there is 1/2 inch of cord between each of the drones.
Tip
Stain or varnish the toothpicks before you attach them.
Video of the Day