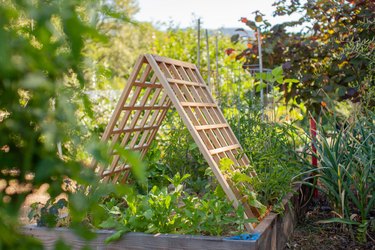
Summer squash are frost-tender, warm-season annuals that can be grown throughout the United States in the summertime. Like gourds and pumpkins, squash are members of the cucumber family. Summer squash differ from winter squash primarily in their harvest date. Summer squash — which include crookneck, straightneck, scallop (also known as patty pan) and zucchini varieties — are picked when young and tender; winter squash are picked when hard and ripe. These tasty, wholesome vegetables are easy to grow, and so productive that even a small planting usually yields an abundant harvest. By following some simple guidelines for proper planting, you can grow summer squash on a trellis, and enjoy their bounty all summer long.
Things You'll Need
Organic compost
Mulch
A-frame trellis, 4 feet high
Old nylon stocking, cut into thin strips
Commercial fertilizer (5-10-10 formulation)
Video of the Day
Step 1: Create a mound of soil
Create a small hill in the planting location by shaping a mound of soil about 8 inches high and about 1 1/2 feet across.
Video of the Day
Step 2: Add squash seeds
Sow the squash seeds 2 to 3 inches deep, planting four to five seeds 3 to 4 inches apart in the soil mound. Don't sow the seeds until three weeks after the last frost, when soil has warmed to at least 60 degrees Fahrenheit.
Step 3: Apply mulch
Apply a 2-inch layer of mulch to conserve moisture and protect the roots.
Step 4: Set the trellis
Set an A-frame trellis in place right after planting, so as to not disturb growing roots later on. The trellis will save space, make it easier to pick the squash, promote better air circulation and prevent them from touching the ground.
Step 5: Water the soil
Water well after sowing the seeds, and keep the soil evenly moist but not wet.
Step 6: Thin the seedlings
Thin the two or three strongest seedlings by snipping the weaker ones off at soil level when the squash seedlings have two sets of true leaves.
Step 7: Attach the squash to the trellis
Attach young squash plants to the trellis with strips of nylon stocking to train them to it, if necessary. If the plants become unruly later in the growing season, you can snip the growing tips to promote lateral branching along the trellis.
Step 8: Fertilize the squash
Feed your summer squash plants with a 5-10-10 fertilizer every 10 days. The squash should be ready for harvest 50 to 65 days after planting.
Tip
Select a planting location in full sun with moderately rich, well-drained soil that you have amended with an organic compost to add nutrients. Squash do best at a soil pH of 5.5 to 6.8.
Choose a type of summer squash that is a vining variety suitable for growing on a trellis. Vining types of summer squash include Italian trombone, Italian vegetable marrow, trailing green marrow and the Peter Pan varieties.
Don't plant entire packets of squash seed—you will be overwhelmed with squash. One plant per family member is usually more than enough.