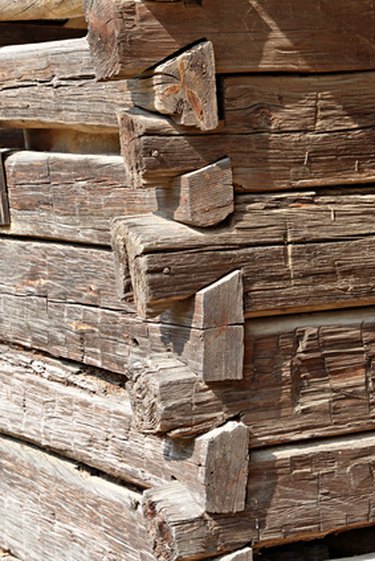
Dovetail joints are some of the hardest joints to cut but are some of the strongest holding joints. The dovetail joint is basically a mortise and tenon joint that has two angled sides interlocking with the next log. Half or whole dovetail notches can be used. Making a jig for your specific-size logs will save time and materials. Rough hand-hewn logs that vary in size will need each joint cut specifically for that corner. Round logs will need to have flat sides on the tenons at the corners.

Video of the Day
Things You'll Need
Nails
Plywood
Tape Measure
Chain Saw
Marker
Logs
Step 1
Lay the log so that it is positioned with the same side facing up after it's placed in position on the house. With the end of the log squared off, mark a level center line horizontally on the log. Mark a center dot or hash mark on the line.
Video of the Day
Step 2
Face the log end with the left side of the log used as the interior side and the right side used as the exterior side. (For this example, the log has a 1-foot diameter.) Mark two vertical lines 3 3/8 inches from the center dot on the horizontal line drawn in step 1. Each line should have the midpoint of the line on the horizontal line. The line on the left should be 10 inches long and the line on the right should be 6 5/8 inches long. Draw a line connecting each end of the vertical lines. The shape should look like a dove's tail feathers that are spread out, with the top angle down on the right and up on the left and the bottom angle up on the right and down on the left. This is the size to use to make a pattern for all future tenons. (A tenon is the protruding part of the joint.)
Step 3
Mark and cut out a piece of plywood with the same dimensions as the tenon end just measured. The plywood should measure 6 7/8 inches wide, with one side 10 inches and the other side 6 5/8 inches. Mark a horizontal center line on both sides of the pattern and drill a hole in the center of the pattern. The pattern can be centered and leveled on the end of any log by aligning the center of the log with the center hole of the pattern. Loosely nail the pattern in place and rotate the pattern until level. Nail it tight and mark around the pattern to outline the four sides to cut out the tenon.
Step 4
Mark a line 1 foot from the end of the log all the way around the log. This is the stop line for the lateral chain saw cuts. If you want the tenons to extend past the corner, mark the line further back. A line marked 14 inches from the end of the log will allow the tenons to extend 2 inches past the corner.
Step 5
Use the chain saw to cut away the four sides to make the mortise (the slot for the tenon). Cut both vertical cuts back to the stop line first. Also cut out these two pieces at the stop line to remove them from the log. Use the chain saw to cut off the top and bottom angled pieces back to the stop line in the same manner. Add horizontal lines from the end of the log to the stop line to use as a guide before cutting off the top and bottom pieces if desired.
Step 6
Place the logs together at a corner location and verify the alignment. The log on the bottom will have only the top of the log cut with a dovetail. The bottom of the log will be without a cut and sit solidly on the foundation.
Tip
Adjust the tenon size to fit the log size. The tenons must be centered on each log end.
Round logs can have the outside edges tapered out to the corner if desired.
The bottom log should have only the top half of the joint dovetailed to allow the bottom of the log to rest on the foundation. The last log on top of the wall should have only the bottom notched.
Warning
Always take safety precautions and wear proper safety equipment while using hand and power tools.