Things You'll Need
Wood or heavy cardboard base
Paper
Pencil
Aluminum foil
Paper packing tape
Gallon of warm water
Large plastic bin
Newspapers
Scissors
Blender
Large bowl
Sieve
White craft glue
Table salt
Plastic bag
Acrylic craft paints
Paintbrush
Elements from nature (twigs, pebbles, etc.)
Hot glue gun
Models can be expensive, especially if you are looking for a large-scale element such as a mountain. If you are a hobbyist or student who needs a mountain for your model, you can save a lot of money by creating a paper mache mountain yourself. All you need to make a mountain form are paper scraps and supplies you probably have lying around your kitchen right now. With some paint and accessories you can give it a finishing touch to make it look authentic.
Step 1: Choose a Base
Find a sturdy base made of wood or cardboard that is wider than the size you want your finished mountain to be.
Video of the Day
Step 2: Sketch It Out
Sketch a rough image of the mountain you have in mind. Think about how steep you want it, how many peaks you want, and estimate the overall height and width.
Step 3: Create the Mountain Model
Crumple large sheets of aluminum foil loosely to create the form, whether a mountain or plants, according to Illustoria. Shape the foil the way you want your mountain model to be shaped, making peaks and valleys. Let the shape taper off so it spreads out naturally. Glue the foil structure to the base, molding it and forming it, adding more foil if necessary, until you are satisfied with the shape.
Step 4: Cover With Paper Tape
Cover the entire foil mountain frame with a layer of paper packing tape. This helps to hold the shape and provide a smooth, absorbent surface for the paper mache to adhere to.
Step 5: Prepare the Paper Mixture
Pour a gallon of warm water into a large plastic bin. Cut or tear newspaper into 1-inch to 2-inch squares. Add enough newspaper scraps to the water until you have a soupy mixture.
Step 6: Make a Pulp
Pour 2 to 3 cups of the mixture into a blender and puree the paper. Add more water if the mixture is too thick. Pour the pureed mix into a fine sieve to drain away excess water, then place the paper mache pulp into a large bowl.
Step 7: Add Glue and Salt
Puree the rest of the paper into pulp in 2- to 3-cup increments and add the pulp to the bowl. Mix the paper mache pulp with white craft glue and 1/4 cup of table salt until it's thick, wet and pasty, like the consistency of creamy oatmeal. Alternately, Model Railway Engineer recommends using a mixture of water, glue and flour and torn paper strips.
Step 8: Cover the Mountain Form
Scoop some of the pulp in your hand and begin spreading it over the mountain shape. Start from the bottom at the base and work your way up the mountain peaks.
Step 9: Add Details With Texture
Add details to the mountain with the paper pulp if desired. Create ridges by making a thin line of pulp and pinching it. Put two ridges next to each other to look like a stream. Make small foil balls and cover them to create boulders. Allow the structure to dry overnight once you are satisfied with it. Preserve the leftover paper pulp in a sealed plastic storage bag in the refrigerator.
Step 10: Paint the Mountain
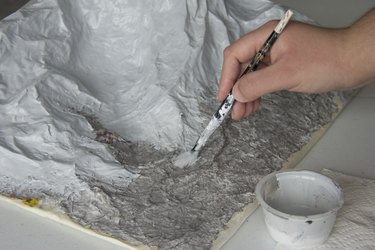
Paint the mountain with acrylic paints. Think about which direction the light would hit it, and use a lighter color on that side. Paint the other side with a color that's two or three shades darker to indicate shadows. Paint details, such as blue streams and a white snow cap.
Step 11: Add Natural Details
Hot-glue miniature evergreen branches, pebbles and twigs around on the mountain if you want to add trees and realistic natural details.
Tip
Be sure to use paper packing tape, as paper mache pulp will not adhere well to duct tape, rubber or clear plastic tape.
Video of the Day