Things You'll Need
Elbow trap kit
Teflon tape (optional)
Adjustable pliers or pipe wrench
Pail, old dish pan, or other container
Rubber gloves
Hand Saw
Transition gasket (if needed)
Slip joint pipe (if needed)

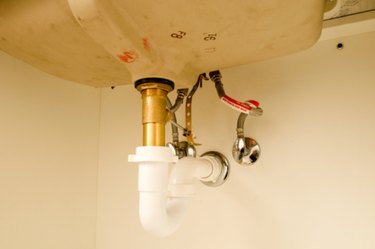
A sink drain is a simple creation. First is a threaded tail piece leaving the bottom of the sink. Next comes an elbow trap -- sometimes referred to as a J-bend, which is actually two pieces that attach either to the sink tail piece or to a short slip joint extension on one end and the outside pipe on the other. Then comes the outside pipe, going to the sewer.
The trap catches and holds objects that drop down your sink, like your wedding ring. It also provides easy access to clogs, which tend to form at the bottom of the J instead of further on in your plumbing. Most importantly, it prevents sewage gases from re-entering the house. Age and use can lead to leaking P-traps (one of three types of J-bends) and clogs. Fortunately, replacing the pipe is fairly simple.
Video of the Day
Step 1
Empty your sink of all water and clear the workspace below the sink, setting contents in an out-of-the-way area. You may need room to maneuver and plumbing is typically in confined areas.
Step 2
Turn off the water if you choose, just to make sure that the faucet is not accidentally turned on while you make repairs. Locate the water shut-off either under the sink (a round knob that you will turn clockwise) or at the main water inlet, such as a water meter.
Step 3
Place a bowl, pail, or other container underneath your drain plumbing to catch excess water during your repair. While the sink may be empty, water will be sitting in the bottom of your J pipe, and you will want to avoid it pouring out over your head and into your cabinet or on your floor.
Step 4
Unscrew the nut that secures the trap to the outside pipe (typically coming out of the wall). This will look like a wider ring made of the same material as your pipe -- typically PVC plastic in newer construction but it may also be metal. You may be able to hand loosen, or you may have to use a tool such as a pipe wrench or large, adjustable pliers. Turn the ring to the left (counterclockwise) to loosen.
Step 5
Remove the nut attaching the trap to the sink drain tailpiece similarly. Unscrew the nut attachment in the middle of the trap, if necessary, to manipulate the trap and get it out of a confined area. Remove the pipe carefully to keep trapped water from going everywhere.
Step 6
Assemble your complete trap before continuing. Use a kit and place the straight and curved sections together to form the trap. Secure with new nuts. Add a transition gasket at the tail (straight section) end if you have a smaller diameter pipe coming from the wall than the pipe diameter of the trap.
Step 7
Make a "dry run" of your new trap installation to make sure everything will fit, before securing it into place. Keep in mind the tail of the trap needs to insert into the wall pipe as far as possible. You may need to cut some trap kits to size with a hand saw if too long. On the other hand, if it is too short, you will need to add a slip joint and nut to seal and secure the slip joint to the trap, at the wall.
Step 8
Secure the trap, adjusting as necessary to install. In some instances, leaving the nut in the middle of the trap somewhat loose may aid in positioning the new trap. Make sure the whole assembly acts as if it wants to stay in place by itself easily before tightening nuts. Any strain on the new trap will lend itself to trap and drain failure. Hand tighten firmly.
Step 9
Test for leaks by running water in the sink several times, allowing it to fill up to create downward pressure on the trap and pipes. Adjust as needed if you note any moisture or leakage at the connections.
Tip
Wear rubber gloves when disassembling your trap to avoid contact with water containing bacteria. While S-traps may be common in older construction, always replace with a P-trap if possible. Building code requires new construction to use P-traps. Wrapping pipe threads with teflon tape is an option to ensure a good seal -- but is not required. Do not use any adhesive.
Warning
Only transition from plastic PVC pipe to metal pipes at slip joints for best results. Do not over-tighten plumbing connections. This can lead to leaks and drain failure.
Video of the Day