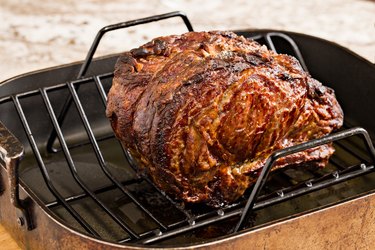
Since the earliest days of humankind, people have been setting meat above a heating source and serving it up warm and delicious. At some point, someone discovered that if you set meat directly in a pan, it will taste different than if you set it in something that holds it above the bottom of the pan, and the roasting rack was born. Roasting racks are easy to use, and they allow for air circulation around the meat so it cooks evenly rather than letting the bottom of the meat stew in its own juices.
Roasting Rack Basics
Video of the Day
Using a roasting rack is pretty simple. The important thing is to make sure your meat has at least 2 inches of space from the bottom and sides of the pan. Some chefs even recommend using your roasting pan on an aluminum foil-covered rimmed baking sheet, as this allows maximum airflow around your meat.
Whether you use a baking sheet or a pan, to use the roasting rack, preheat your oven and then prepare your meat according to the recipe instructions. Next, place the rack in the middle of the pan and set your meat on the rack, ensuring you have 2 inches of airflow on every side. Cover the meat with tented aluminum foil or place a lid on the roasting pan.
Once the meat is in place on the rack in the pan, place it in the oven for the required time. Use a meat thermometer to ensure the meat reached a safe internal temperature. After the meat has cooked, allow it to rest for 10 minutes after removing it from the oven before moving it or cutting it.
Choosing a Roasting Rack
There are dozens of expert reviews online debating the best roasting racks on the market. Generally, all experts agree that U- and V-shaped racks are better than flat racks because they ensure the meat stays in place and doesn't shift around while being set in the oven. Aside from that, you should keep in mind:
The size of your oven since the pan, rack and meat all must be able to comfortably fit in the oven.
The weight of the meat you're planning to cook, as a cheap, small rack won't work well for something massive like a 25-pound turkey.
The size of your roasting pan if you're just buying a rack, because obviously the rack must fit inside the pan.
The materials with which you prefer to work
–
some chefs prefer copper, some cast iron, some ceramic and some silicone. It's important to consider the properties with which you prefer to work while cooking and take these into account while shopping.
Your budget, since most reviewers tend to prefer expensive racks, but few home chefs actually require a high-priced roasting rack.
DIY Roasting Rack
Roasting racks are great, but sometimes you need to cook a meal and realize at the last minute that you don't have a roasting rack available for one reason or another. What to do? Don't worry, just make a DIY roasting rack — and relax, it's a lot easier than it sounds.
To make a roasting rack substitute, all you need is something to keep your meat positioned away from the bottom of your roasting dish. The easiest thing to use is tin foil. Simply crumple the tin foil into logs or one long spiral and set it in the bottom of your roasting pan and then put the meat on top. If the meat is still too close to the bottom of the pan, crumple up more tin foil and add it to your existing structure to make the makeshift roasting rack a little taller.
Alternatively, you can use metal cookie cutters or ceramic ramekins as long as they are all the same height. Just place as many cookie cutters or ramekins as you can along the bottom of your pan and then set the meat on top like you would a rack.
Check out this related video from ExpertVillage on Youtube