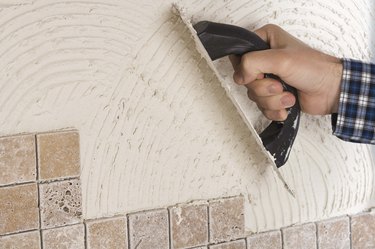
Tiles come in a variety of natural and man-made materials, and they make durable, attractive surfaces for both walls and floors. The key to a long-lasting and attractive tile installation is proper substrate preparation. A completed tile job is extremely heavy and requires a substrate sturdy enough to support the weight. Additionally, tiles range in size from a square inch or less to several square feet. Each tile must be installed individually, so it is critical that the substrate be level to prevent uneven edges in the finished product.
Inspect the Concrete Surface
Video of the Day
Before beginning a tile installation over a concrete wall, perform an inspection to look for any damage to the concrete surface, signs of moisture penetration or obviously uneven areas. If moisture penetration is found, check with the manufacturer/distributor of the tiles to be installed over the concrete; certain types of natural stone are not suitable for installation in wet environments.
Video of the Day
If there is damage to the concrete, or the area is uneven, it may still be possible to install the tile. As long as the wall is structurally sound and capable of supporting the additional weight of the tile, the surface imperfections can be compensated for during installation.
Prepare Tiling Surface
For application over an uneven concrete surface, a lightweight, waterproof construction board must be used as an alternative to concrete board in a tile installation. Construction board panels are extremely light and easy to cut, but they provide a very strong, durable and waterproof surface on which tiles will be installed.
Construction panels can be "spot bonded" with thinset, which is the process of applying large spots of thinset to the side of the board facing the concrete wall approximately every 12 inches. This process will work on painted or bare concrete. If the concrete has been sealed, better adhesion may be achieved by going over the concrete with a grinder to create a rough surface. The board is then pressed into place on the wall and adjusted for plumb and level. The thinset will firmly bond the board to the concrete surface, concealing all surface imperfections on the concrete behind the construction board and leaving a perfectly level and even surface for the tile.
Preferably starting at a corner, measure and cut the first construction board panel to size using a utility knife. Spot bond the panel to the concrete wall using unmodified thinset mortar. Continue this process for subsequent panels, making sure each time that the newly installed panel is level and plumb with the previous panel.
Installing the Tile
Tiles can be set over the construction board panels using unmodified thinset mortar. The notch size of the trowel used may vary depending on the size and type of tiles to be installed, but V-notch trowels are generally preferred for wall installations. Check with the manufacturer/distributor of the selected tiles to be sure the proper notch size is selected.
Starting at the bottom of the first construction board, preferably in the corner, spread a layer of thinset onto the surface with the trowel. Use the trowel to notch the thinset evenly and completely, then remove the excess. Spread a smooth layer of thinset on the back of the first tile and press it firmly into the notched layer on the wall. Apply even pressure to force the air out of the thinset and to make firm contact between the layer of thinset on the tile and the layer on the wall. Check the tile for plumb and level, then proceed to the next tile.
As each tile is installed, check to verify that it is plumb and level with the tiles before it. Use spacers as necessary to keep tiles in the proper position.
Finishing the Job
After all the courses of tile have been installed, and the thinset has an opportunity to dry, the tiles are ready to be grouted. For unpolished tile such as slate, a sanded grout is generally appropriate, whereas an unsanded grout is appropriate for polished tile such as granite. Check with the manufacturer/distributor to be sure the proper grout is selected.