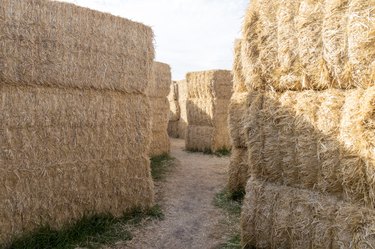
A hay bale maze is a classic part of autumn, pumpkin patch and Halloween-themed activities. The concept is fairly simple – create a maze of walkways framed by stacked hay bales – but the execution takes some planning and teamwork. Design the maze on paper first using an accurate scale to ensure the model translates correctly to the real-life DIY hay maze. Planning the logistics, which involves acquiring, moving and arranging the necessary number of hay bales, is also key to pulling off this awesome project.
Hay Bale Maze Supplies
Video of the Day
As far in advance as possible, figure out where you can buy or acquire an appropriate number of hay bales for a maze and how you can transport them to the maze site. If you're in a farming community, this might be as simple as chatting with a neighbor or acquaintance who has access to plentiful hay bales.
Video of the Day
Otherwise, contact farm supply companies, landscaping and home improvement stores or big-name retail stores, which might offer decorative faux hay bales as well as the real thing. Find out about delivery or pickup options and be aware of the approximate weight of the bales if you intend to move them yourself. Come up with a plan for returning, reusing or donating the bales after you're finished with the maze.
When you have identified a reliable source for hay bales, select the size of the bales you intend to use for the maze. It's easier to use bales in one single size, but you can also combine smaller and larger bales if you wish. Before ordering, plan the maze on paper to determine how many bales you will ultimately need.
Hay Bale Maze Designs
Note the length and width of the hay bales you will use for your maze and scale them down to a rectangle small enough to draw on paper. For example, if the bales are 3 feet long and 1.5 feet wide, scale them down to rectangles measuring 3 centimeters by 1.5 centimeters. Use graph or squared paper as the base for the design and cut out a few dozen rectangles from cardstock to represent the hay bales.
Trace a border on the paper to represent the size of the area in which you will construct the maze using the same scale. For example, if 1 foot is represented by 1 centimeter, a 50 by 50-foot area would be drawn as a 50 by 50-centimeter square.
On a separate piece of paper, roughly sketch a hay bale maze design with solid walls, including an entrance, exit and several dead ends. You might also look online for existing maze designs that fit your vision for a DIY hay bale maze. Next, translate this rough design to an exact scale model by arranging the cardstock rectangles (representing individual hay bales) within the square you drew. Rearrange the pieces as much as is needed until you're happy with the final design and then glue them in place. Count the total number of bales on the page and double it if you're making taller, stacked walls; this tells you how many bales to buy.
Building the Hay Bale Maze
Before you start building the DIY hay bale maze, map out the maze on the ground using a tape measure and sidewalk chalk, spray paint or another suitable marking tool. Consult your paper guide for the dimensions and maze layout. Next, move the bales into place to create the walls of the maze, copying the layout of the hay bale maze design on paper.
You might want to decorate the maze for a fun Halloween or pumpkin patch theme. Arrange items around the maze, such as pumpkins, scarecrows, fake spider webs and skeletons. Consider a fog machine and lighting options if the maze will be used after dark.